Sharing Data Publicly in BrainSTEM
Table of contents
- Introduction
- What becomes public
- Before you start
- Step 1: Make the project public
- Step 2: Decide which personal attributes to share
- Step 3: Make the personal attributes public
- End state
- Revoking public access
- Next steps
Introduction
This tutorial makes a project public, together with the setups, behavioral assays, data storage, inventories, protocols and licenses its entries refer to. At the end, anyone can read the project on the public portal and through the public API, without an account.
Prerequisites: the Owner role on the project and on the entries you want to share (see Manage Projects).
Public access flows from the project to everything that belongs to it (subjects, sessions, procedures and their modules). The permissions page shows this inheritance in the interactive data model.
Making a project public does not share the personal attributes its entries refer to. Behavioral assays, setups, data storage, inventories, protocols and licenses each have their own public setting and must be made public separately.
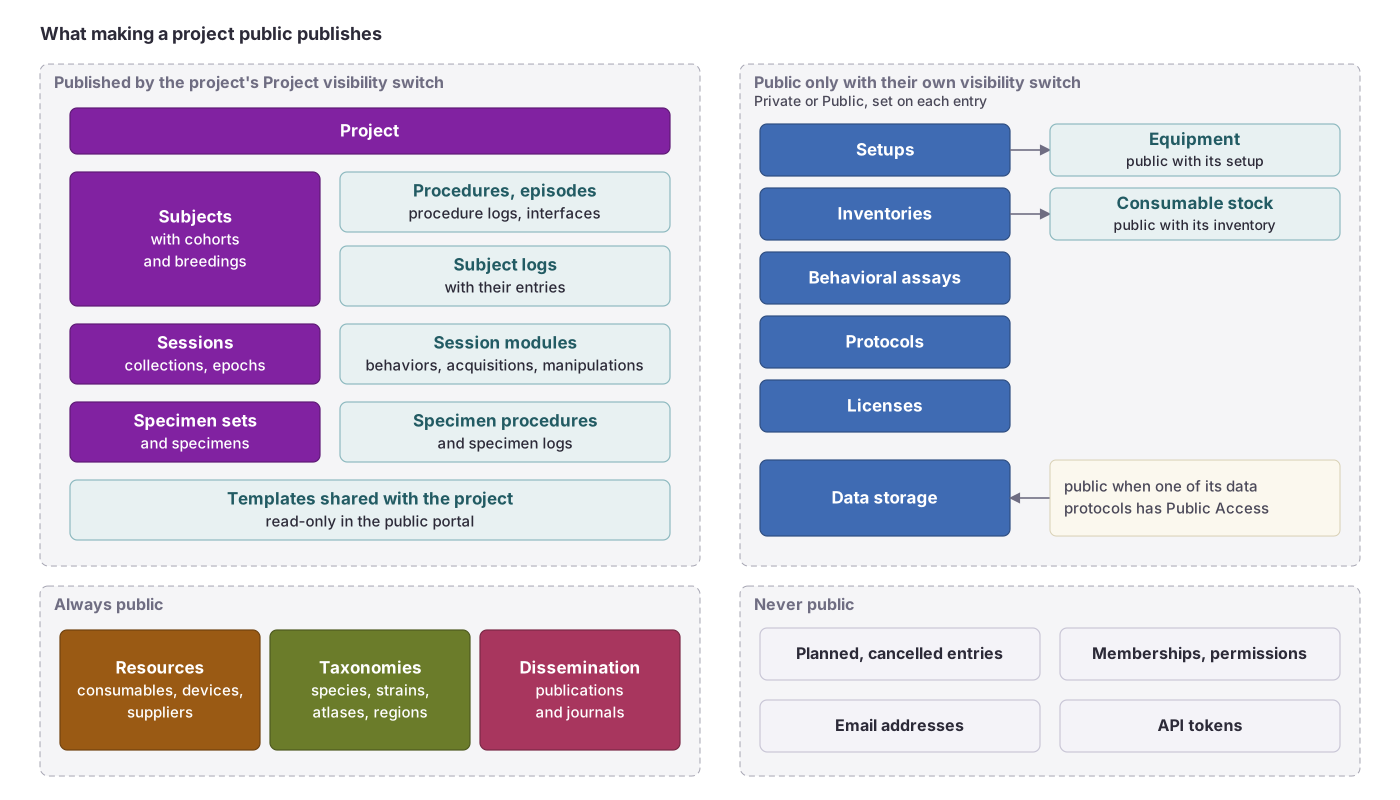 What the project’s visibility switch publishes, what needs its own switch, what is always public and what is never public.
What becomes public
When you make a project public, the following components become publicly accessible:
| Component | What Becomes Public |
|---|---|
| Subjects | Subject details, performed procedures and episodes, experimental interfaces, subject and procedure logs |
| Specimen sets | Specimen sets and specimens, their specimen procedures and logs |
| Sessions | Performed sessions with their epochs, behaviors, data acquisitions and manipulations |
| Collections | Session collections and groupings |
| Cohorts and breedings | Subject cohorts and performed breedings |
| Templates | Templates shared with the project |
Planned entries are never public. Planned subjects, specimen sets and specimens, and planned or cancelled procedures, sessions and breedings stay hidden on the public portal and in the public API until they are marked performed, enrolled or collected.
Membership and permission lists are never public. Shared catalogs (species, strains, consumables, hardware devices, publications) are always public.
Before you start
- Review sensitive information: Ensure no personally identifiable information or proprietary data is included
- Complete documentation: Fill in descriptions for projects, sessions, and personal attributes
- Verify data quality: Check that all metadata is accurate and complete
- Test internally: Have lab members verify access to ensure nothing is missing
Step 1: Make the project public
You need Owner on the project.
- Click Projects in the left navigation menu
- Select your project from the list
- Click the Edit button to access the project settings
- In Project visibility, switch from Private to Public
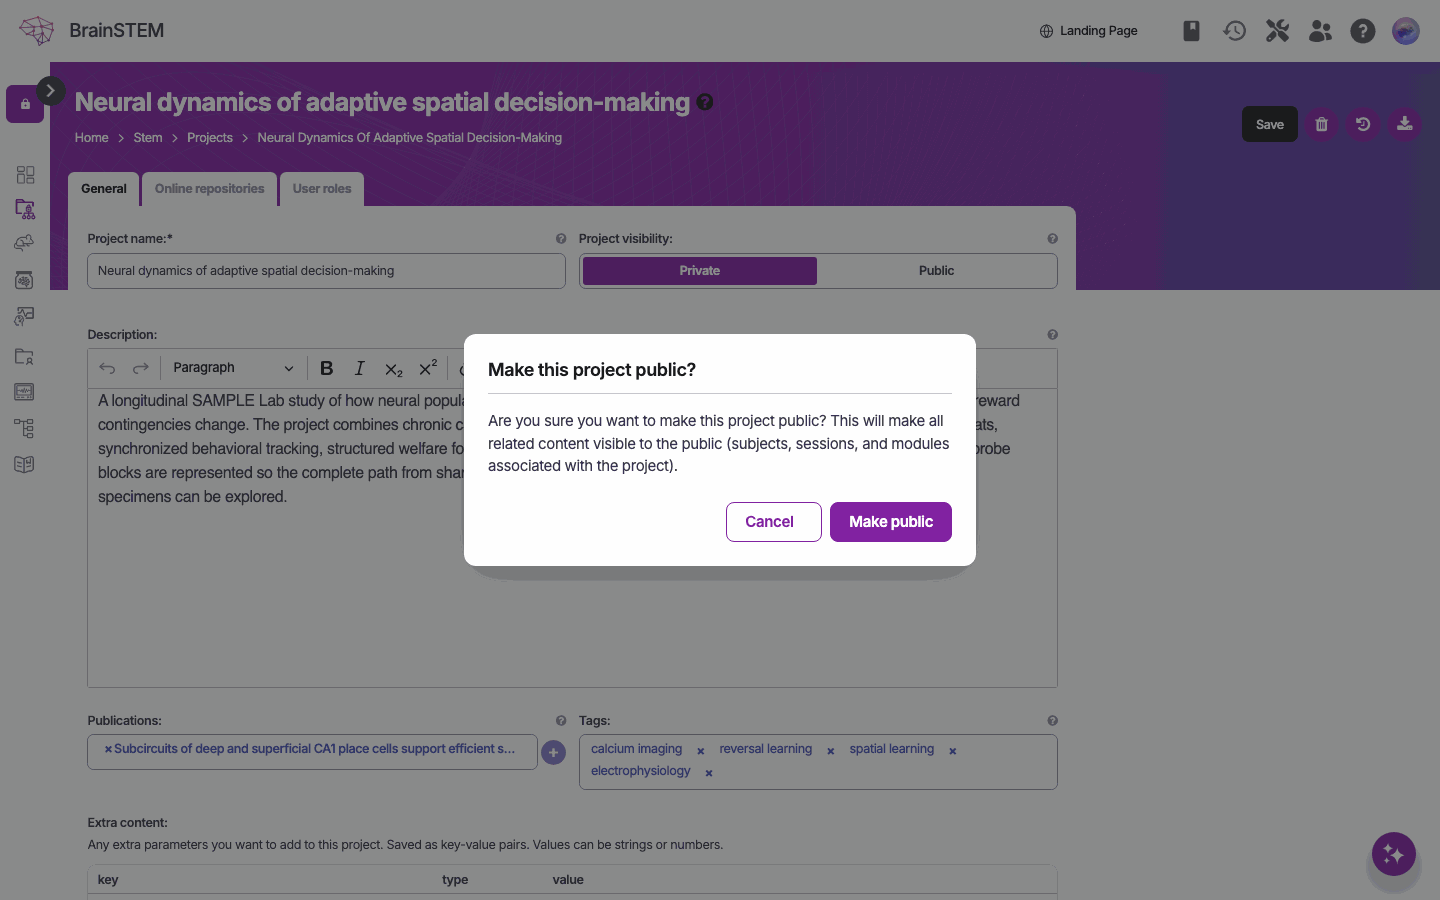
The project Edit form: switching Project visibility to Public opens the “Make this project public?” confirmation dialog
- The confirmation dialog Make this project public? appears.
- Click Make public to proceed, or cancel to keep it private
- Click Save to apply your changes
What happens after making a project public:
- The project appears on the public portal at www.brainstem.org/public, which needs no account. Visitors get read-only lists and details pages; filters, column settings, exports and bulk actions are reserved for signed-in users.
- Anyone can read the project through the public API at
https://www.brainstem.org/api/public/...without a token, and MCP clients without a token see it too (see MCP server). - The Interactive data model on the public portal (
/public/datamodel/) still requires signing in; the copy on this site at Interactive data model does not. - Anonymous visitors do not see planned entries (see above).
Use the Public project filter in the Projects list, or the Public status filter on shared catalogs, to check what is public.
Step 2: Decide which personal attributes to share
Without the personal attributes, readers see that a session used a setup or an assay, but cannot open it.
| Personal Attribute | When to Share Publicly | Why It’s Needed |
|---|---|---|
| Behavioral Assays | If your sessions include behavior modules | Users need to understand experimental protocols and task parameters |
| Setups | If your sessions reference specific experimental environments | Users need to know equipment configuration and environmental conditions |
| Data Storage | If you want users to access raw data files | Users need file paths and access protocols to retrieve actual data |
| Inventories | If procedures reference specific consumables | Users need to know exact materials used (probes, drugs, etc.) |
| Protocols | If procedures, subject logs, or procedure episodes reference reusable methods | Users need the method description, URL, and any attached protocol document |
| Licenses | If subjects, procedures or behavioral assays reference the licenses that authorized them | Users can see under which authorization the work was done |
Step 3: Make the personal attributes public
You need Owner on each personal attribute.
- Navigate to the appropriate section:
- Personal attributes → Behavioral assays
- Personal attributes → Setups (equipment follows its setup)
- Personal attributes → Inventories (consumable stocks follow their inventory)
- Personal attributes → Protocols
- Personal attributes → Licenses
- Select the item referenced by your public project
- Click Edit
- Switch its visibility (Setup visibility, Behavioral assay visibility, Inventory visibility, Protocol visibility or License visibility) to Public and confirm the Make public dialog
- Click Save
Data storage has no visibility switch of its own. Its visibility follows its data protocols: on its edit page, set Public Access on the protocol that points at a public location (for example a DANDI or web URL), and keep the lab-internal paths private.
One public data protocol makes the whole data storage public when you save it, with its name, location, description and the public protocols’ paths. Check that no lab-internal path is marked Public Access.
Repeat this for each personal attribute your public project refers to.
Making a protocol public also exposes its attachment: anyone on the public portal or public API can download the attached protocol document. Remove the attachment first if it should stay internal.
End state
The project and its subjects, sessions and modules are on the public portal, and the setups, assays, storage routes and protocols they refer to can be opened there too.
Revoking public access
If you need to make data private again:
- Navigate to the public project or personal attribute
- Click Edit
- Switch the visibility back to Private and confirm Make private in the Stop sharing publicly? dialog
- Click Save
Making a project private will immediately remove it from the public portal. However, users who have already downloaded or accessed the data will retain their copies.
Next steps
- Next: Exporting to NWB: convert the project to NWB files for a data archive.
- Readers can load your public project without a token with
BrainstemClient(anonymous=True)in the Python API tool orBrainstemClient('anonymous', true)in the MATLAB API tool. - Managing Data Storage: add a public data protocol that points at the archived files.
- Data model: Permissions and Projects.