Submission forms
Table of contents
- Overview
- Tabs
- Selecting related entries
- Types and type-specific fields
- Materials editor
- Coordinates
- Planning status
- Templates
- Duplication
- Autosave
- Public visibility
- Validation messages
- Related
Overview
Every entry is created and edited in a form. Forms are organised in tabs, use searchable dropdowns for related entries, and adapt their fields to the type you choose. This page describes the controls that are shared across forms. Field-level descriptions live in the help dialog of each kind of entry (question mark icon) and on the data model pages.
Tabs
Long forms are split into tabs. The first tab holds the general fields; further tabs hold related records. Examples:
- Session: Epochs (N), Behaviors, Data acquisition, Manipulations.
- Procedure, specimen procedure and experimental interface: Materials, and on implant procedures Experimental interfaces (N).
- Subject: procedures, episodes and subject logs with quick-log buttons.
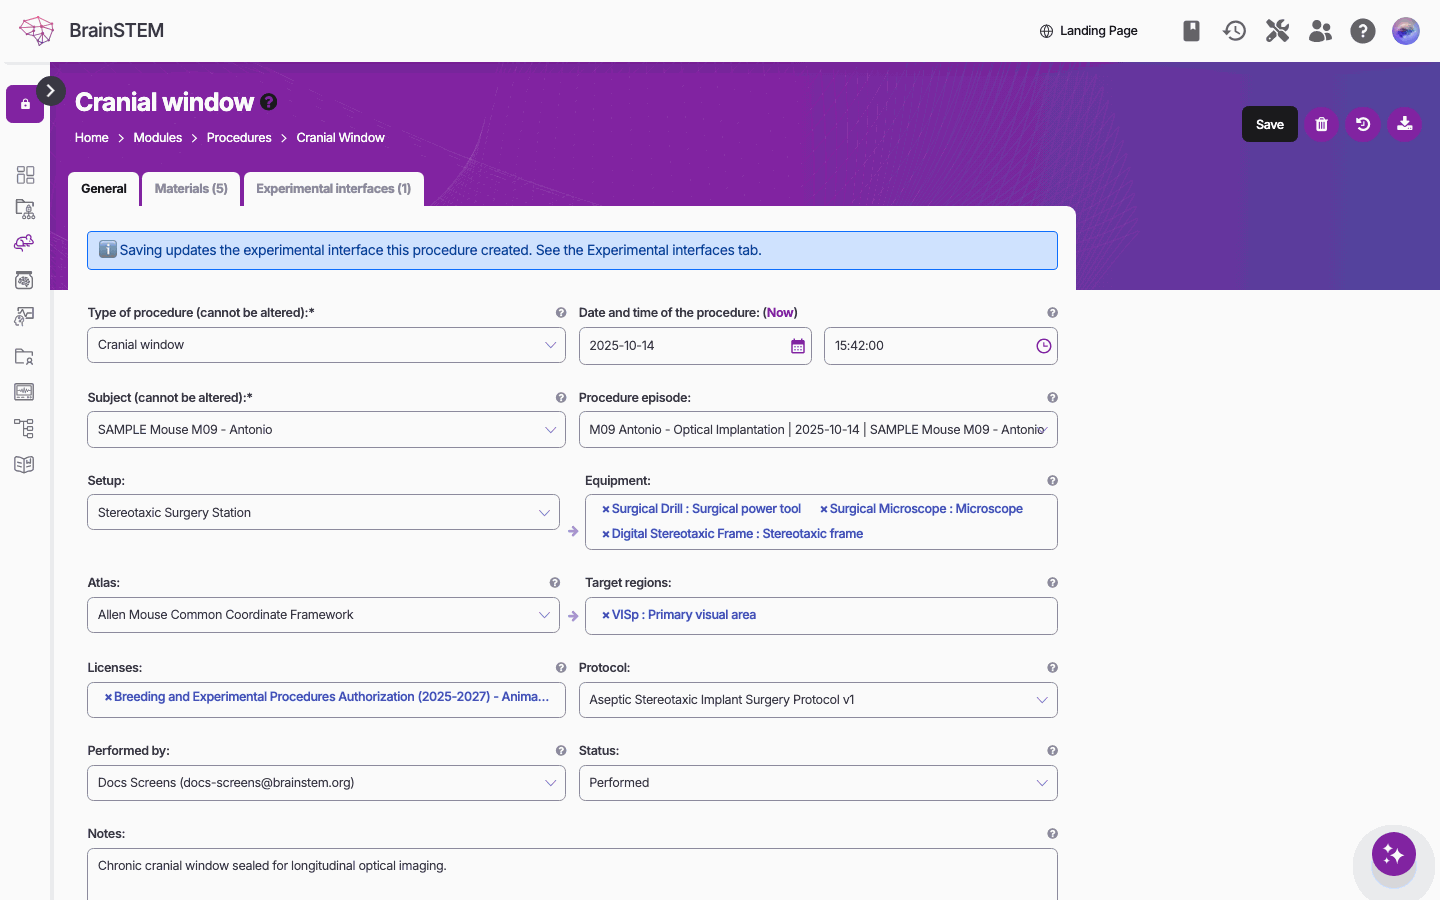
A procedure’s General tab: type, date, subject, episode, setup, equipment, atlas, target regions, licenses, protocol, performer and status; Materials and Experimental interfaces are tabs.
Unsaved changes on one tab are kept while you switch to another tab.
Selecting related entries
Dropdowns for related entries are searchable: click the field and type to filter the options. Beside most of these fields you find three icons:
- Pencil Change selected {entry type} opens the selected entry for editing in a popup.
- Plus Add another {entry type} opens an empty form for a new entry in a popup. The popup inherits the filters of the parent form, for example the selected species.
- Eye View selected {entry type} opens the selected entry read-only.
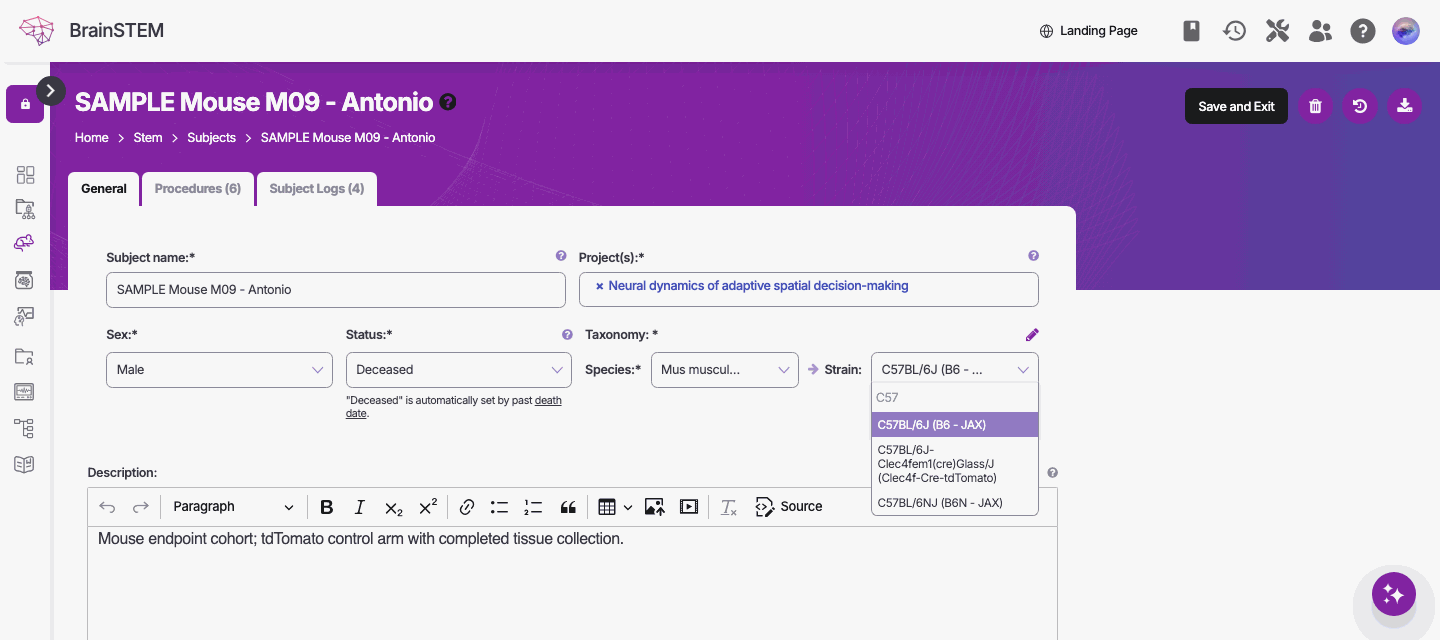
Chained selectors: the Strain list offers only strains of the chosen species.
When you save in the popup, the parent dropdown is updated in place. Interface selectors on data acquisitions and manipulations also offer Add another {entry type} from a template.
Options of shared catalogue entries (species, strains, consumables, suppliers, …) carry a status badge when they are still under review, for example Pending or Changes Required (!). Entries you submitted yourself can be used right away while they wait for approval.
Chained selectors
Some fields depend on another field. The dependent field is disabled until the parent field has a value and is then filtered by it; an arrow points from the parent to the dependent field. Chains include:
| Parent | Dependent |
|---|---|
| Species | Strain (choosing a strain does not set the species) |
| Atlas | Target regions (changing the atlas clears the selected regions) |
| Setup | Equipment |
| Supplier | Consumable |
| Inventory | Consumable stock |
| Procedure type | Coordinate systems and other type-dependent fields |
Species is required on every subject; strain is optional (“No strain specified”). A strain that does not belong to the chosen species is rejected: “The selected strain does not belong to the subject’s species.”
Date and time fields
Date fields have a Today link and date-time fields a Now link that fill in the current value.
Types and type-specific fields
Procedures, data acquisitions, manipulations, equipment, consumables, logs and several other kinds of entry have a Type field. Choosing a type adds a Details · {type} section built from the type’s schema: value and unit pairs, choices, lists, tables and time pickers. Hover over a field label or its help icon for the description of the field. The form also hides general fields that do not apply to the chosen type, for example coordinates are only shown on procedure types that place something in the brain.
Empty optional detail fields are dropped when you save. Changing the type on a new entry rebuilds the details section for the new type. Some types are fixed once the entry exists: the field is then disabled and its label ends in “(cannot be altered)”, for example Type of procedure (cannot be altered). This applies to a procedure, specimen procedure or experimental interface that has materials (“Type cannot be changed while materials are associated with this record.”), to the session type and to the target type of an experimental interface.
Materials editor
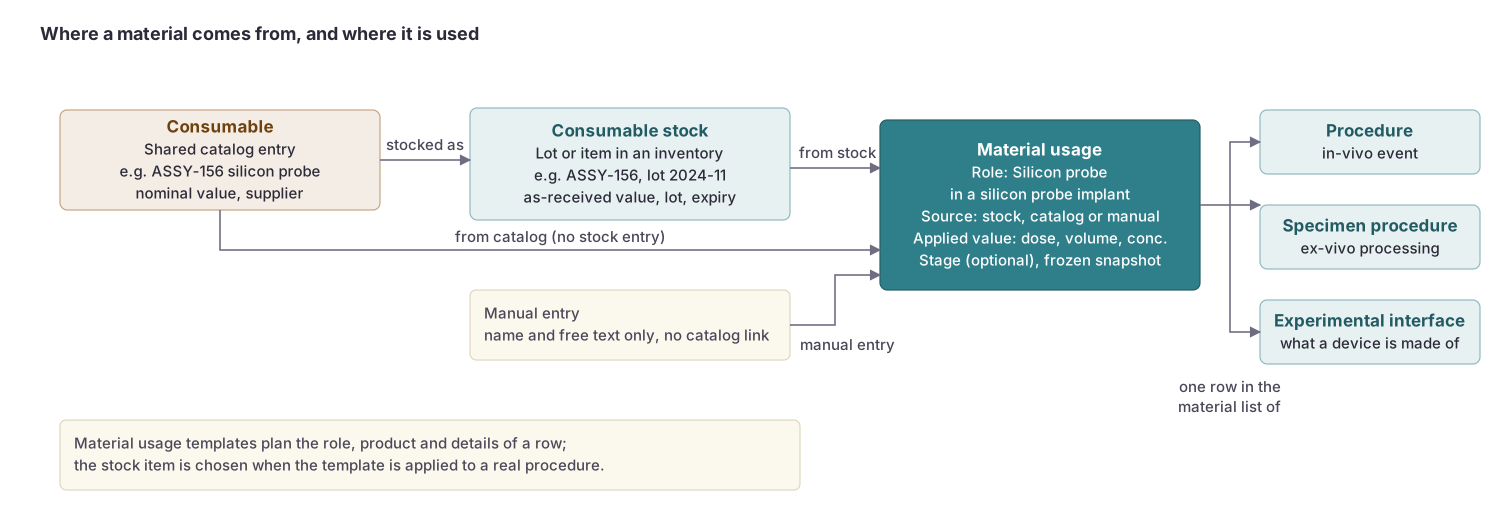
Procedures, specimen procedures, experimental interfaces and their templates have a Materials tab: “Record what was used and where it came from.” Click + Add material to pick a material type; only types that the parent type accepts are listed, with required types first. Each material card has:
- Material type (required).
- Material source (required), one of three:
- Consumable stock (default): pick an Inventory, then a Consumable stock entry. Only stock with status Available or Reserved is offered.
- Consumable: pick an optional Supplier, then a Consumable from the shared catalog. “Use when the product is known but no inventory stock.” Find in inventory switches to stock of that consumable.
- Manual entry: a Material name and optional Specification. Some material types do not allow manual entries (“Not allowed for this material type”).
- Stage, when the type has stages (see below).
- Apply only to these specimens on specimen procedures.
- Details · {type} with the type’s fields, and Notes (up to 500 characters).
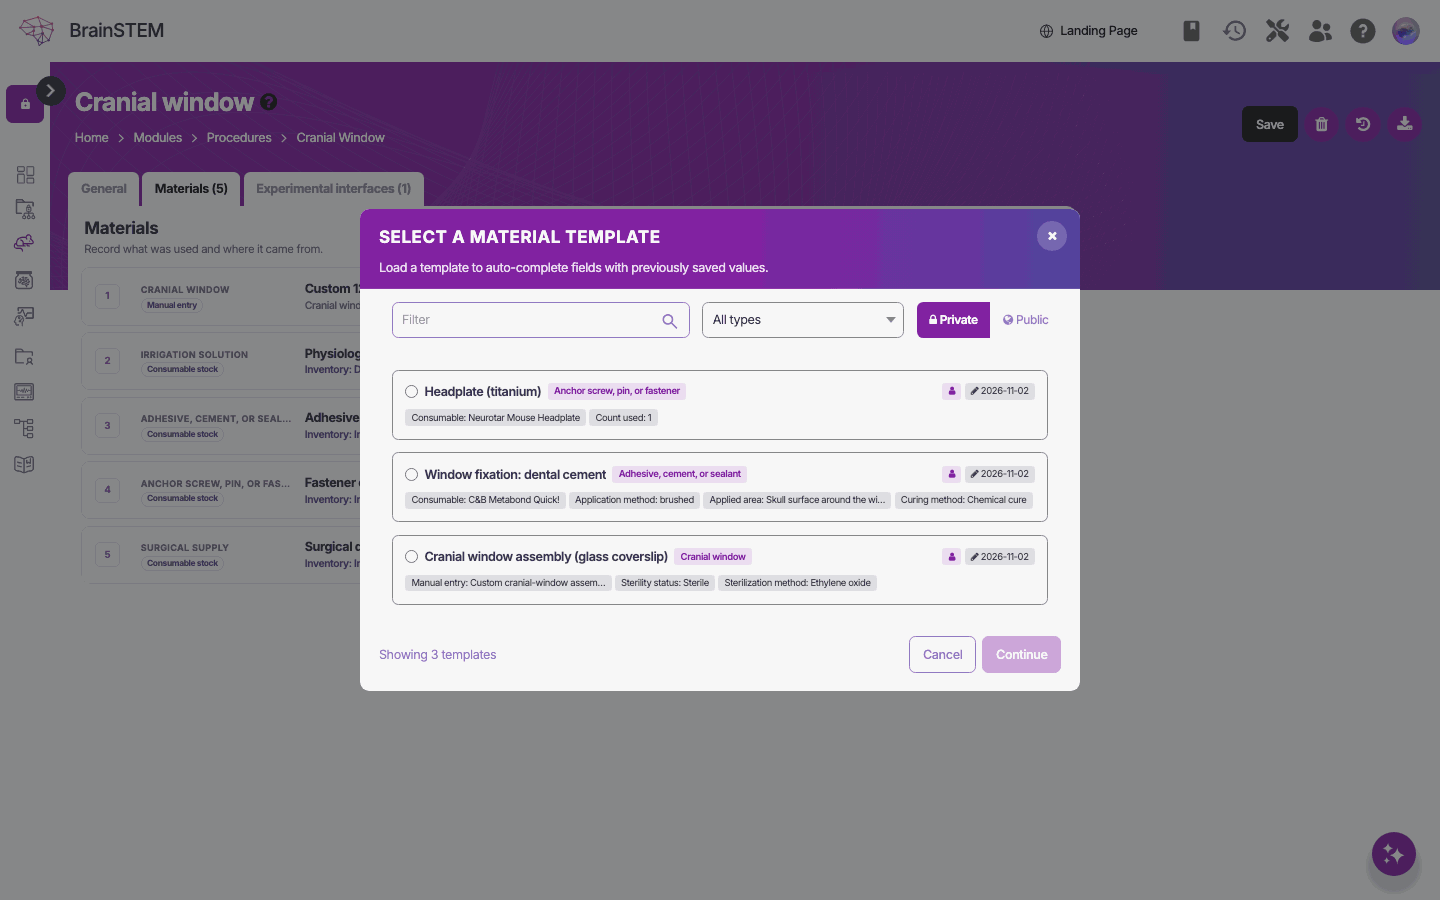
Card actions let you move, duplicate or remove a material and Save as material template. Requirement pills show Added, Missing or N of M added for required material types. Use template inserts materials from the material template library. Add consumable and Add consumable stock links inside the pickers create catalogue entries without leaving the form.
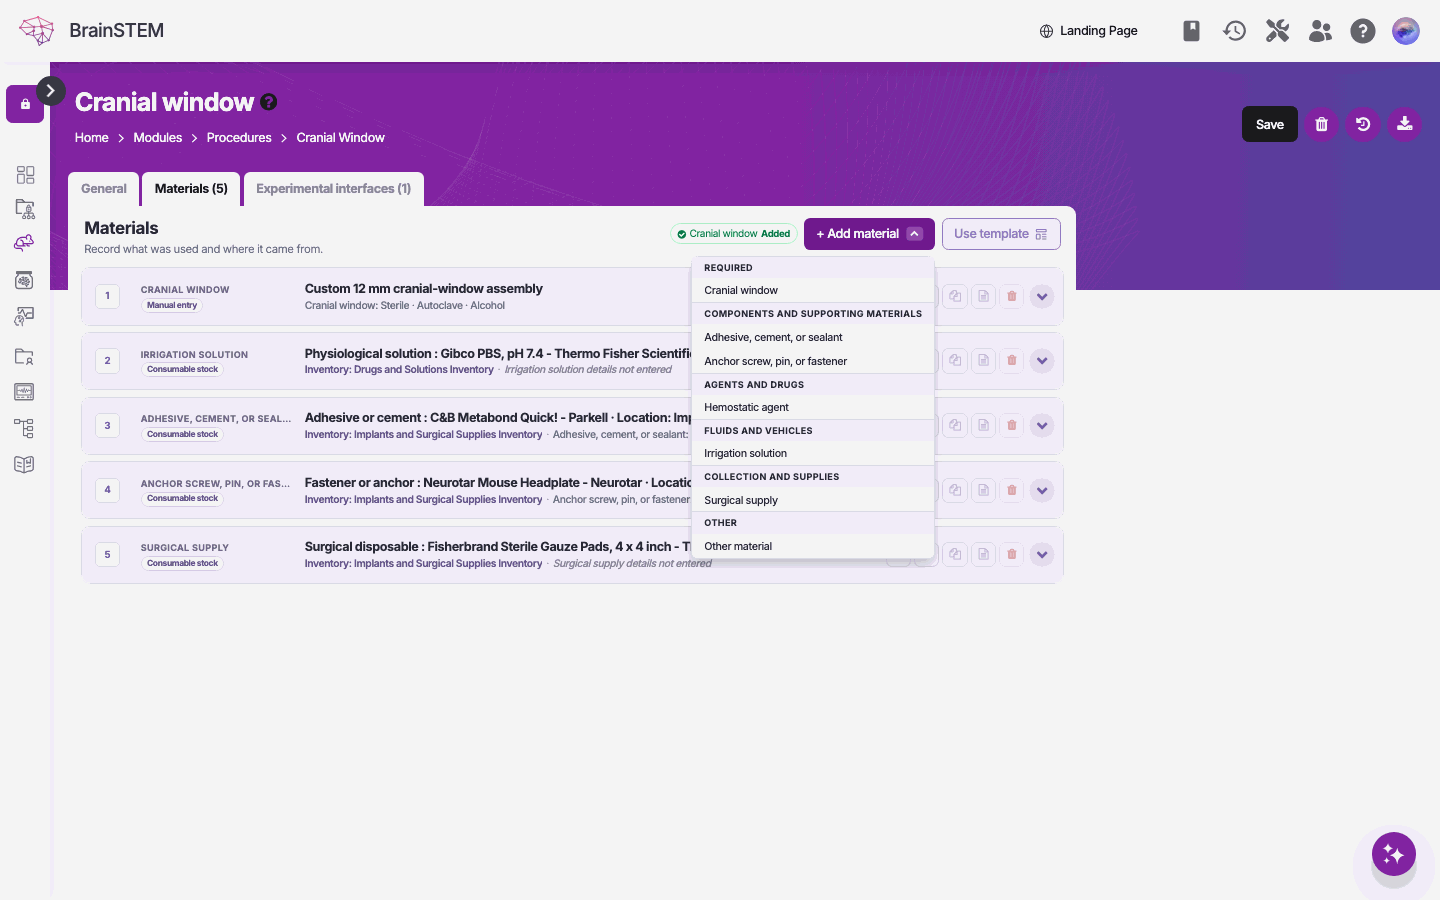
A material backed by stock stores a snapshot of the stock (catalog item, inventory, batch, dates, status, storage location), “so the experimental entry remains interpretable if inventory data later changes.”
Using stock in a material does not change the stock: quantities are not decremented and the status is not updated. Set the status of a stock entry by hand on the stock itself, for example when a lot is used up.
Validation messages include “Choose a material source.”, “Choose a stock entry.”, “Choose a catalog material.”, “Enter a material name for the manual source.”, “Select a stage for this material type.” and “{type}: add at least N material(s).” An empty materials list is allowed while you build the entry; minimum counts are checked once any material exists.
On compact inline rows (for example procedures on a subject page) the editor opens as a Materials (N) dialog that saves on its own, “independently of the page’s own Save button.”
Stages
Some procedure types are recorded in stages, and materials are attached to the stage they took part in.
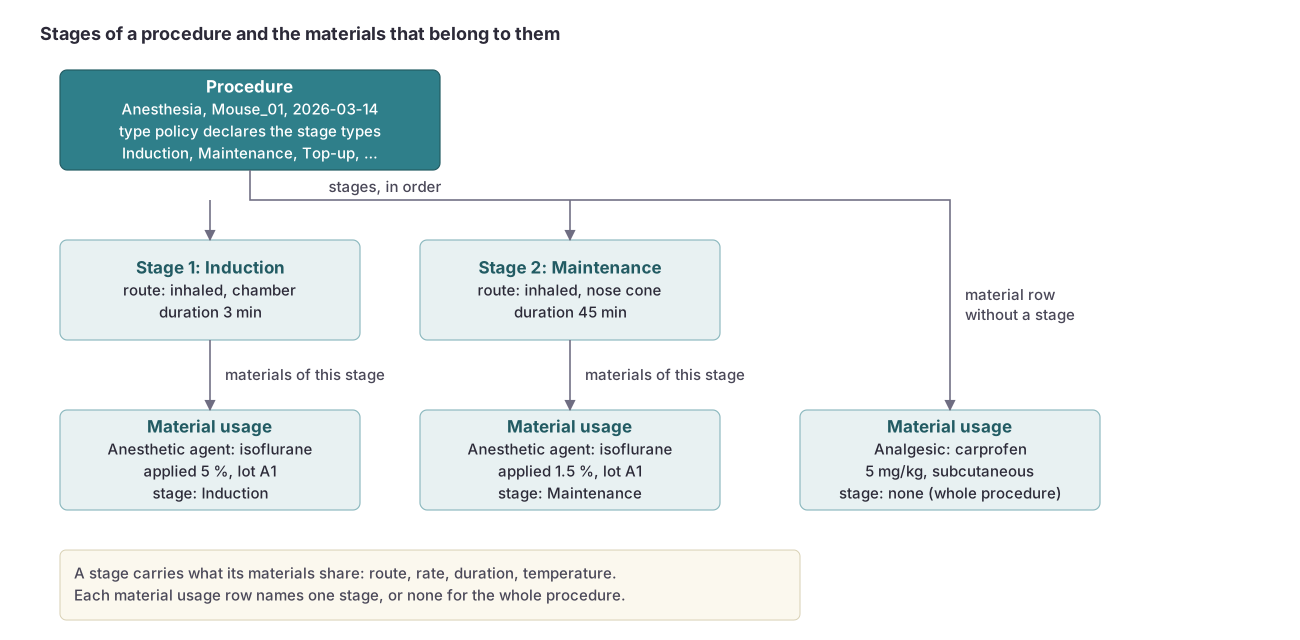
Stages appear as sections in the Materials tab next to a Whole procedure section for materials not tied to one stage. Click + Add stage to add a stage with a Stage type, conditions and Stage notes; a material’s Stage field can also create a stage.
Regular procedure types with stages are Anesthesia (Induction, Maintenance, Top-up, Reversal, Emergence, Other), Sedative (induction, maintenance) and Perfusion fixation (Flush, Fixation). Every specimen procedure type has stages, for example Immunolabeling (permeabilization, blocking, primary incubation, wash, secondary incubation, detection, counterstain) and Fixation (fixation step, wash step).
See the Materials data model page for the material chain and stage rules.
Coordinates
Procedure types that place something in the brain have a Coordinates field with a coordinate system dropdown and the fields of that system (AP, ML, DV or depth, angles, rotation, units). An Atlas field chooses the reference atlas for the target regions, preloaded from your profile’s atlas preference. View coordinates opens the coordinate viewer, which draws the entry point and track in a 2D and 3D atlas view for supported species.
Coordinate systems, atlases, the region picker and the viewer are described on Atlases and coordinates.
Planning status
Procedures, specimen procedures, sessions and breedings have a Status of Planned, Performed or Cancelled (default Performed). While an entry is planned, an orange Planned pill is shown beside the title and a header button performs the transition: Mark as performed on procedures, specimen procedures and sessions, Mark as started on breedings. Subjects, episodes, specimens and specimen sets have their own planned states and transition buttons.
Rules such as “a performed procedure needs an enrolled subject” are checked when you save or transition. See Planning for the full list and for what a planned entry looks like.
Templates
Templates store the fields of a procedure, specimen procedure, experimental interface, data acquisition, manipulation, procedure episode or material so you can reuse them.
- Create a template from an existing entry with the Create Template button on its details page or Create template in the list row menu. Give it a Template name and optionally Share with projects; a template without projects stays personal. A template shared with a public project is visible read-only in the public portal (see Public visibility).
- Use a template with Create from template in the list’s Add dropdown, or Use template inside a form (“Insert data from a template”). The Select a Template picker filters by type and creator, shows how often you used each template, and then asks for the fields that are never copied: subject, specimen set, session, start date and time or interface name as appropriate. “Template applied successfully!” confirms the insert.
Templates copy the type, details, coordinates, equipment, target regions, licenses, stages and materials. Stock-backed materials are stored as catalog materials in the template, so the lot is chosen again at use. Browse and edit your templates under Tools → Templates.
Duplication
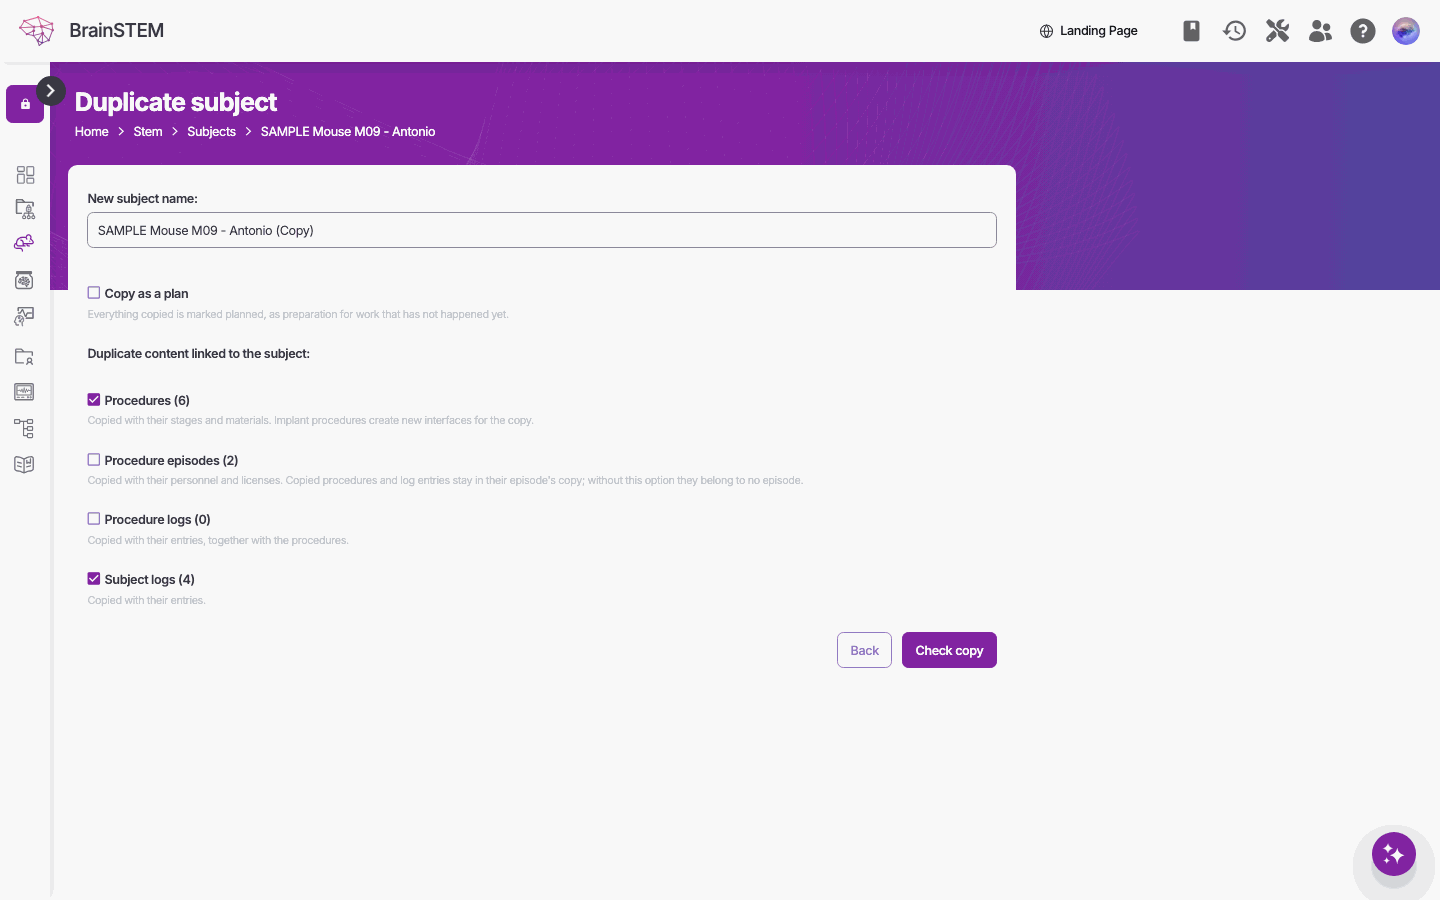
Guided duplicate page of a subject: name field with (Copy), the Copy as a plan option, the related-record checkboxes with counts (here Procedures and Subject logs ticked), and the Back and Check copy buttons
Duplicate on a details page or in a row menu creates a copy.
- Subjects, sessions, specimen sets and procedure episodes open a guided duplicate page. The name defaults to “{name} (Copy)”. Choose which related records to copy, for example Procedures (N), Subject logs (N) or Data acquisitions (N), Epochs (N). Copy as a plan marks everything copied as planned, “as preparation for work that has not happened yet.” Click Check copy for a dry run that reports what would differ, then Duplicate.
- Other kinds of entry open a prefilled add form titled Duplicate {entry type}. Stages and materials are copied when the type stays the same; log entries are not copied (“The copy starts as an empty log.”). The form warns about links you cannot add yourself.
The copy belongs to you. Physical identity (experimental interfaces, tissue) is never copied, and stock you cannot use is downgraded to a catalog or manual material.
Autosave
The change forms of subjects, sessions, specimen sets, procedure episodes, setups, inventories, behavioral assays, data storages, licenses and protocols save automatically about 1.5 seconds after your last change. A status pill shows Saving changes…, Saved or Not saved — … with the reason. Use Save and Exit to leave the page.
All other forms, including procedures and data acquisitions, are saved only when you click Save. No drafts are kept in the browser, so leaving the page without saving loses what you entered.
Epochs on the session form and the Materials (N) dialog on inline rows save on their own as well.
Public visibility
Projects, setups, inventories, protocols, licenses and behavioral assays have a visibility switch with Private and Public (for example Project visibility). Data storages have none; each of their data protocols has its own Public access value. Switching to Public asks for confirmation: “Are you sure you want to make this project public? This will make all related content visible to the public (subjects, sessions, and modules associated with the project).” Switching back to Private asks “Stop sharing publicly?”.
Making a project public makes all its related content visible to everyone, including anonymous visitors: its subjects, sessions and the modules recorded in them. Templates shared with the project become visible read-only as well. See Public data for exactly what becomes public.
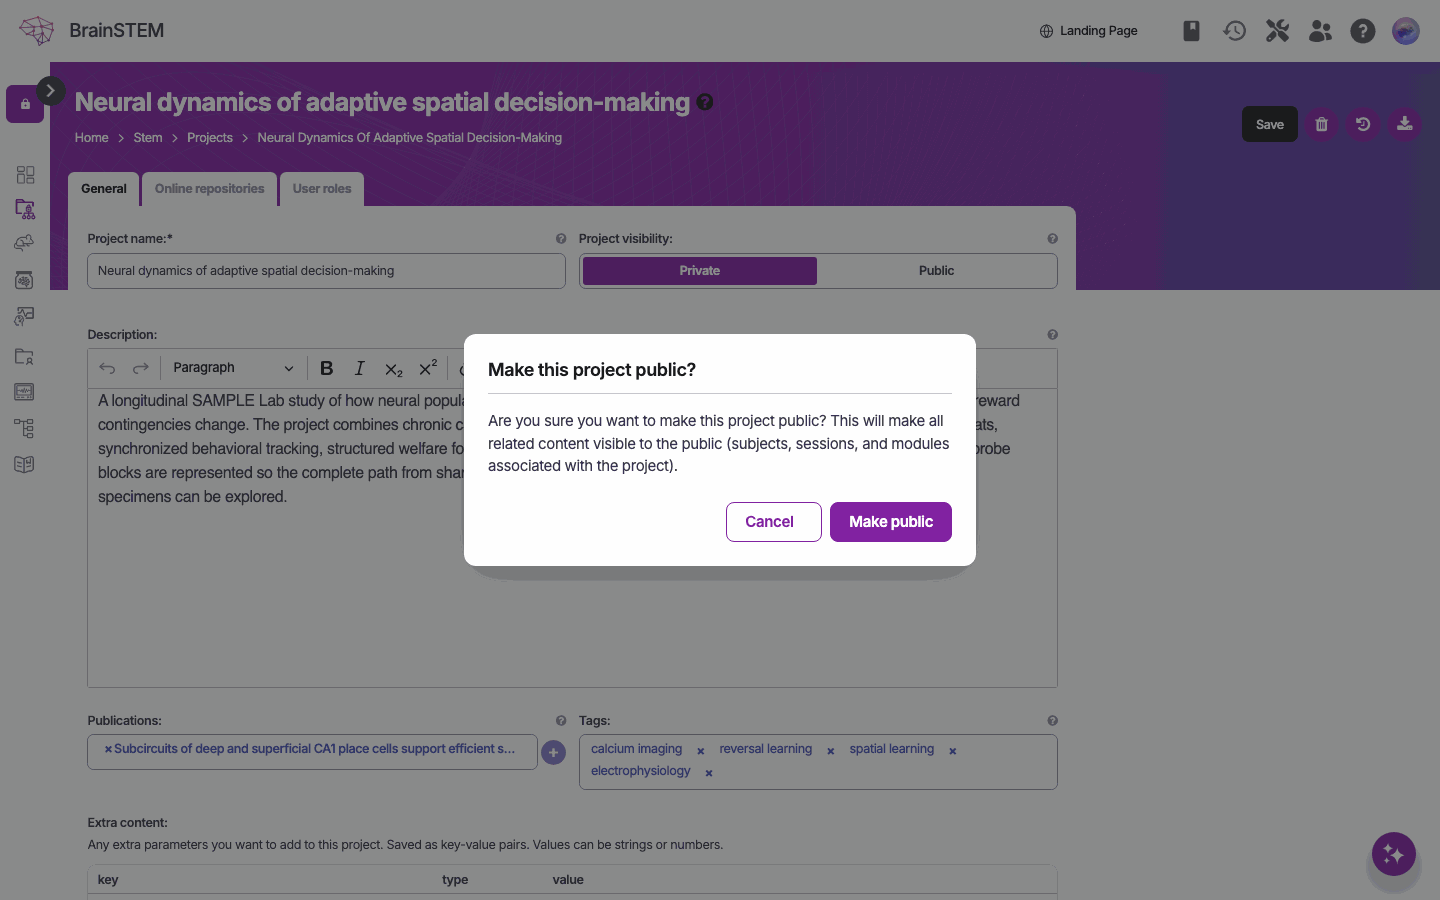
Switching a project to Public asks for confirmation before anything is shared.
Validation messages
Validation runs when you save. Errors appear at the top of the form and next to the field. Common messages:
- “A species is required for every subject.”
- “The selected strain does not belong to the subject’s species.”
- “The atlas must match the subject species.” and “All target regions must use the selected reference atlas.”
- “Set the date and time the procedure was performed.” (when marking a planned procedure as performed)
- “End must not be before start.” (epochs)
- “This data acquisition is already linked to another epoch. Each data acquisition represents one recording and can only belong to one epoch.”
Password fields show a live checklist of the password rules while you type.
Related
- Materials: the material chain and stages behind the Materials tab
- Templates: what a template stores, which entries can be made from one and who can use it
- Atlases and coordinates: the Atlas field, the region picker and the coordinate viewer
- Planning: the Status field and the transitions of planned entries
- Single entry view: the read-only page a saved form opens
- Permissions: who may add and change entries in a project