Sharing and memberships
Table of contents
- Overview
- The Manage page
- Inviting a colleague or a group
- Answering an invitation
- Changing levels and removing access
- Leaving
- Joining a group
- What a level lets a colleague do
- Related
Overview
You share your work by giving a colleague or a group a level on it. Two kinds of entries carry their own members:
- Projects hold the study data: subjects, sessions, specimens and everything recorded on them. Access to a project covers all of it.
- Lab resources (personal attributes) are setups, inventories, behavioral assays, data storage, licenses and protocols. Each one has its own members and is shared on its own, independently of the projects that use it.
Access is granted by invitation: nothing changes until the invited person or group accepts. The levels are Member, Contributor, Manager and Owner; each includes the one before it. What each level allows, and how entries inherit access from their project, is described on the Permissions page.
The Manage page
Open a project or a lab resource and click Manage (sliders icon) in its header. The Manage permissions page opens. Anyone with access can open it; only Managers and Owners can change it, for everyone else the boxes are read-only.
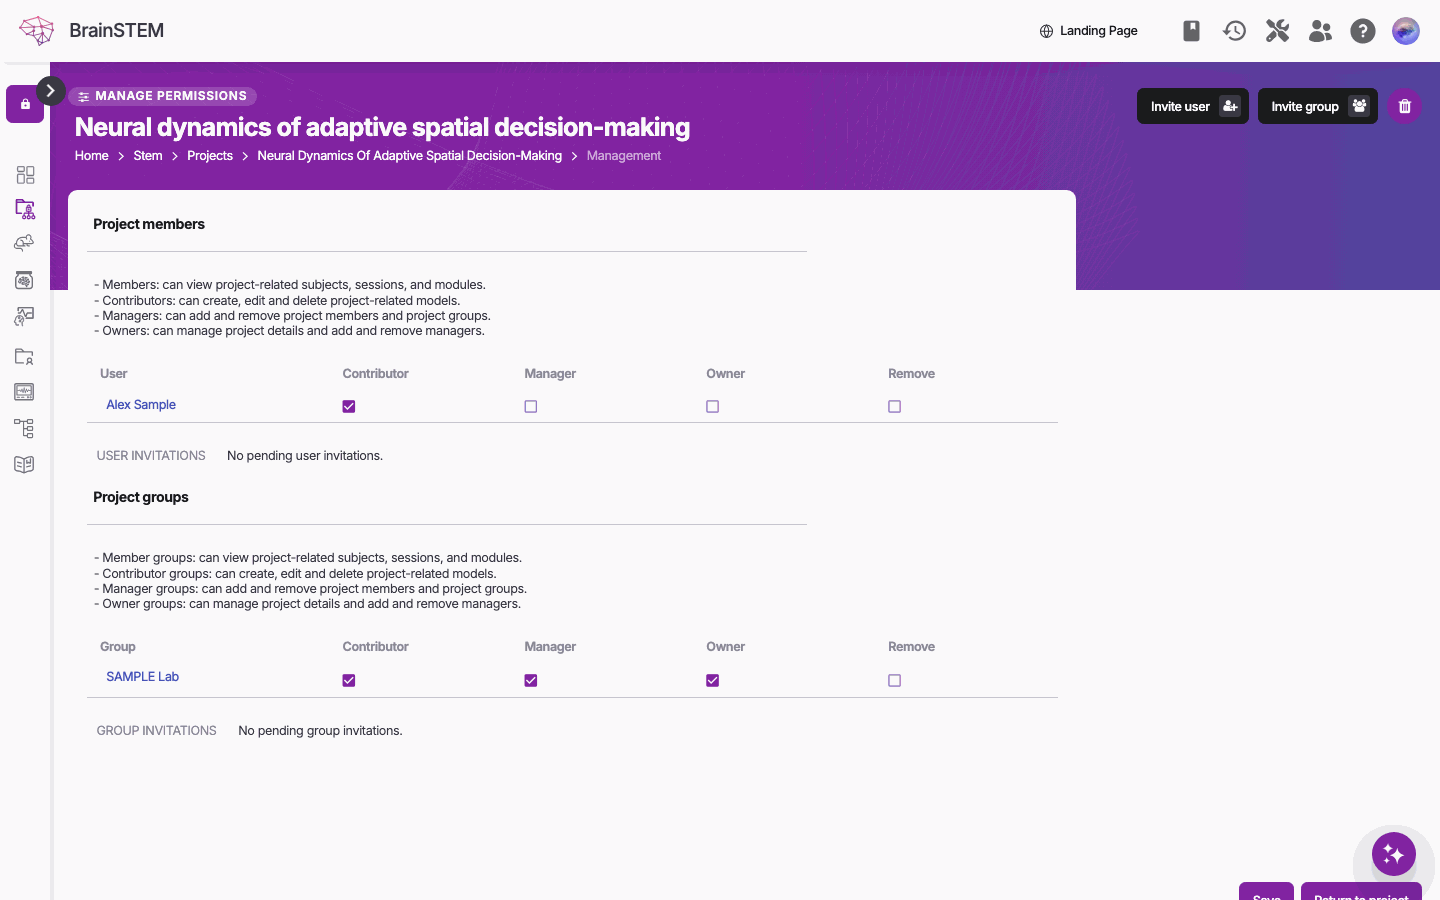
The Manage permissions page of a project: a user with the Contributor level under Project members, a group with Contributor, Manager and Owner under Project groups, and the Invite user and Invite group buttons.
| Part | What it shows |
|---|---|
| Project members (Members on a lab resource) | The users who hold a level themselves, with the boxes Contributor, Manager, Owner and Remove. A row with no level ticked is a Member. People who have access only through a group are not listed by name; the group’s row covers them. |
| Project groups (Groups on a lab resource) | The groups that hold a level, with the same boxes. Every member of a group holds the group’s level. |
| USER INVITATIONS and GROUP INVITATIONS | Invitations sent but not yet answered, with the level they grant |
| PENDING INVITATIONS (NEW USERS) | Invitations to email addresses without an account, with their Expires date |
| Button | Shown to | What it does |
|---|---|---|
| Invite user, Invite group | Managers and Owners | Open the invitation form, see below |
| Save | Managers and Owners | Applies the ticked boxes |
| Return to project (projects), Back (lab resources) | Everyone | Goes back to the entry |
| Leave project, Leave setup, Leave license and so on | Members who are not Owners | Gives up your own access, see Leaving |
Inviting a colleague or a group
- On the Manage permissions page, click Invite user or Invite group.
- Type the person’s email address or the group’s name. Existing users and groups are suggested as you type; people and groups that already have access or a pending invitation are not suggested.
- If you are an Owner, choose the level under Extra permissions by ticking Contributor:, Manager: or Owner:. Leave all three unticked to invite a Member. Ticking Manager or Owner includes the levels below it.
- Click Send invitation. Back returns without inviting.
The person, or for a group its managers (its members when it has none), receive an email with a link to the invitation.
Managers who are not Owners do not see Extra permissions: their invitations grant the Member level. Once the invitation is accepted, a Manager can tick Contributor on the Manage permissions page.
| Message | Meaning |
|---|---|
| “Invitation sent to join project “…”!” | The invitation was created and the email sent |
| “User … already has access to project “…”.” | The person is already a member; change their level on the Manage permissions page instead |
| “An invitation for … is already pending.” | An earlier invitation has not been answered yet |
| “Could not find group with name …!” | Pick the group from the suggestions; the name must match exactly |
| “Please enter a valid email address.” | The text typed for a user is not an email address |
The messages name the kind of entry, for example “setup” instead of “project”.
Inviting someone without an account
Enter the email address of someone who has no BrainSTEM account yet. BrainSTEM emails them a sign-up link (“Invitation sent to … They will receive a signup link to join …”). When they register through the link with that address, they get the level of the invitation straight away; no further acceptance is needed.
The invitation is valid for 14 days and is listed under PENDING INVITATIONS (NEW USERS) until then. Managers and Owners can Resend it or Cancel invitation. A link used after the expiry date shows “This invitation has expired. Please contact the person who invited you.”
Answering an invitation
Invitations reach you by email and in BrainSTEM. Click the Users, groups & invitations icon in the header and choose Invitations & Requests. The Pending Invitations and Requests page counts the open invitations and requests that concern you, both those you received and those sent for entries you manage, in the sections New Users, Groups, Projects (User invitations and Group invitations) and Personal Attributes (per kind of lab resource). Click a count to open the list.
- Click Accept to join with the level shown in the row, or Deny to refuse. On the Manage permissions page of an entry you can already open, the same choice reads Accept and Decline.
- After you accept, “Accepted invitation successfully!” confirms it and the entry’s managers are notified by email.
An invitation addressed to a group can be accepted by any member of that group, and the whole group then holds the level, including people who join the group later. Access through a group is not removed when one member leaves the entry; it lasts until that person leaves the group or the group is removed from the entry.
Managers and Owners withdraw an unanswered invitation with Cancel on the Manage permissions page, or Cancel invitation in the invitation list.
Changing levels and removing access
On the Manage permissions page, tick or untick Contributor, Manager and Owner in a row, or tick Remove, then click Save. “Permissions updated successfully!” confirms the change. A removed user or group loses access immediately.
| Rule | Message |
|---|---|
| Managers can change Contributor and remove Members and Contributors. Only Owners can grant or take away Manager and Owner, and only Owners can remove a Manager or Owner. | “Only project owners can assign or change manager/owner permissions”, “Only project owners can remove managers or owners” |
| An entry always keeps at least one Owner. | “Cannot remove the last owner from the project” |
| You cannot remove yourself or take away your own Owner level; use the leave button instead. | “You cannot remove yourself from the list. To leave a project, click the Leave project button”, “You cannot remove yourself from the owner list.” |
On a lab resource the messages name the resource, for example “Only setup owners can remove managers or owners”.
Leaving
Click Leave project (or Leave setup, Leave inventory, Leave behavioral assay, Leave data storage, Leave license, Leave protocol) on the Manage permissions page and confirm with Leave. “You left the project successfully!” confirms it and you return to the list.
- Leaving removes only the level you hold yourself. Access you have through a group stays until you leave the group or the group is removed.
- Owners do not see the button. Ask another Owner to remove you; the last Owner cannot leave.
Joining a group
Groups have their own members (Member, Manager, Owner), and a level given to a group on a project or lab resource reaches everyone in it. On a group’s page, click Request membership to ask to join; you can withdraw the request with Cancel request. The group’s managers answer with Accept or Deny on the group page or under Invitations & Requests → Groups → Membership requests. Managing a group is described in Managing groups.
What a level lets a colleague do
The full rules are on the Permissions page. The ones collaborators run into most:
- Editing an entry needs Contributor on at least one of its projects.
- Adding a project to an entry needs Contributor on that project. A colleague who is only a Member of your project cannot file their entries in it.
- On a lab resource, Contributor is what lets a colleague use it in their own entries:
| Lab resource | Contributor allows (as the Manage permissions page says) |
|---|---|
| Setup | “creation, editing and deletion of equipment related to the setup and for assigning the setup to behaviors” |
| Inventory | “adding items to the inventory and adding items to other models” |
| Behavioral assay | “adding the behavioral assay to a behavior” |
| Data storage | “assigning the data storage to sessions” |
| License | “assigning the license to other entries” |
| Protocol | “editing the protocol” |
Related
- Permissions: the levels on groups, projects and lab resources, and what every entry inherits its access from
- Managing projects and Managing groups: step-by-step tutorials
- Sharing a project publicly: making a project readable without an account
- User profile: your own memberships, invitations and requests
- List view: the Permissions filter shows the entries where you hold a given level