Ephys Workflow: Theta Maze with Sleep Sessions
This tutorial records a chronic Neuropixels experiment in rats, from the first animal to an exported project: a project, four subjects and their cohort, the probe implant with the experimental interface it creates, one day of recordings (sleep, the theta maze task, sleep again) and the collection that groups them. At the end you download the project as a JSON file that the NWB converter reads.
Table of contents
- Prerequisites
- Part A: Project and Subjects
- Part B: Surgery and Interfaces
- Part C: Recording Sessions
- Part D: Organize and Export
- Next steps
Prerequisites
- You are a Contributor of your lab’s group (see Get started! and Manage Groups).
- The records below exist; this tutorial selects them by these names.
Records you need first
| Name | Kind | Key settings | Created in |
|---|---|---|---|
| Theta Maze Rig | Setup | Setup type Theta maze | Lab infrastructure |
| Sleep Recording Box | Setup | Where the rat sleeps before and after the task | Lab infrastructure |
| Surgical Station | Setup | Where the implant surgery is done | Lab infrastructure |
| Neuropixels System | Equipment | Records the probe | Lab infrastructure |
| Sleep Box Camera | Equipment | Camera of the Sleep Recording Box | Lab infrastructure |
| OptiTrack System | Equipment | Motion tracking of the Theta Maze Rig | Lab infrastructure |
| Stereotaxic Frame | Equipment | Frame of the Surgical Station | Lab infrastructure |
| Neural Electrode Inventory | Inventory | Holds the consumable stock Neuropixels 2.0 probe, status Available | Lab infrastructure |
| Lab Server | Data storage | Where the recordings are stored | Managing Data Storage |
| Theta Maze Alternation Task | Behavioral assay | Setup type Theta maze, Behavioral paradigm Delayed Alternation, Authenticated groups your lab group | Behavioral Assays |
Required fields are marked with an asterisk (*) in the web interface and in the tables below. Several forms open with a short first step and continue after Create and continue. Subject and session forms then save automatically.
Project, cohort and collection forms do not save automatically. Click Save before you leave them, or the changes are lost (see Forms).
Part A: Project and Subjects
Step 1: Create the project
- Go to Projects and click Add project.
- Enter Project name (must be unique) * Theta Maze Spatial Learning Study and select your lab group under Authenticated groups. The groups you select get Contributor access.
- Click Create and continue, enter the Description “Place cell dynamics and memory consolidation during theta maze alternation, with chronic Neuropixels recordings in rats and sleep before and after each session”, leave Project visibility on Private and click Save.
The form looks as in Get started.
Step 2: Add the subjects
- Go to Subjects and click Add subject.
- Fill in the first step:
| Field | Value |
|---|---|
| Subject name (must be unique) * | TM_R001 |
| Projects * | Theta Maze Spatial Learning Study |
| Sex * | Male |
| Species * | Rattus norvegicus |
| Strain | Long-Evans (only strains of the chosen species are listed) |
| Status * | Active |
The form looks as in Get started.
- Click Create and continue and add Genetic line Wild type, Birth date 2024-05-01 and Subject identifier Red-001 (the ear tag).
- Add TM_R002, TM_R003 and TM_R004 the same way, or open TM_R001 and click Duplicate: enter the new name, choose which procedures and logs to copy, click Check copy and then Duplicate.
Step 3: Record housing and weight
- Open TM_R001 and click Edit. The Subject Logs panel lists the subject’s logs.
- Click Add log, choose Housing log, enter the Description “Housing for the theta maze cohort” and click Next. Fill in the first entry and click Save entry:
| Field | Value |
|---|---|
| Start and end time | 2024-08-01 08:00:00 (leave the end empty) |
| Location | Animal Facility Room 204 |
| Cage ID | Cage_A1_pair |
| Light cycle | 12:12 light-dark cycle (lights on 07:00) |
- Click Add log again, choose Weighing log, click Next and save an entry with Date and time 2024-08-01 09:00:00 and Weight 385 g.
Later entries go into the same logs with Add entry. The fields of every log type are on the Subject log types page.
Step 4: Create the cohort
- Go to Cohorts (below Subjects) and click Add cohort.
- Enter Cohort name TM_Learning_Cohort_1, Project Theta Maze Spatial Learning Study and Subjects TM_R001 to TM_R004.
- Click Create and continue, add the Description “4 male Long-Evans rats, pair housed, food restricted to 85% of body weight during training” and click Save.
Part B: Surgery and Interfaces
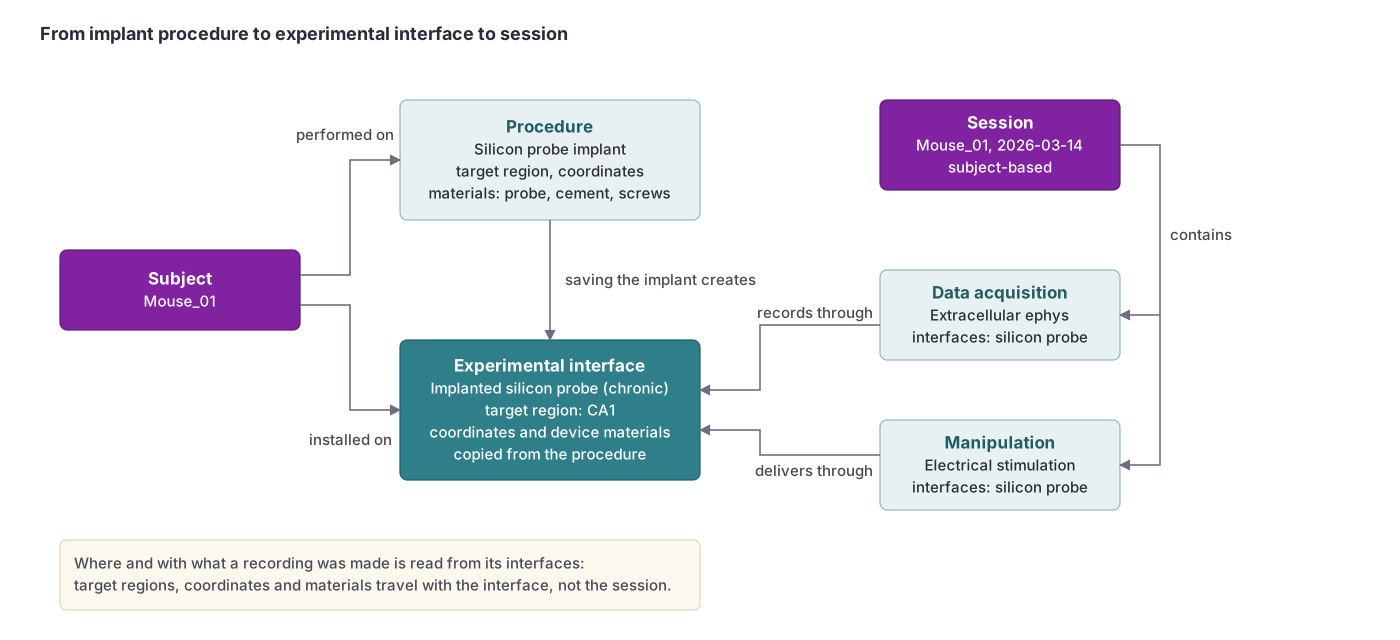 Saving an implant procedure creates an experimental interface on the subject. Sessions record through the interface, so a data acquisition inherits where (target region, coordinates) and with what (materials) it was made.
Step 5: Record the Neuropixels implant
A procedure records the surgery with its coordinates, target regions and materials. Creating a performed Silicon probe implant also creates the experimental interface (the implanted probe) that the recordings refer to.
- Go to Subjects → Procedures, click Add procedure and choose Create blank.
- Fill in:
| Field | Value |
|---|---|
| Type of procedure * | Silicon probe implant |
| Date and time of the procedure | 2024-08-15 10:00:00 |
| Subject * | TM_R001 |
| Setup | Surgical Station (narrows the equipment list) |
| Equipment | Stereotaxic Frame |
| Atlas | Waxholm Space Sprague Dawley Rat Brain Atlas |
| Target regions | Cornu ammonis 1, Dentate gyrus |
| Status * | Performed |
| Notes | Chronic Neuropixels 2.0 implant in right dorsal hippocampus. |
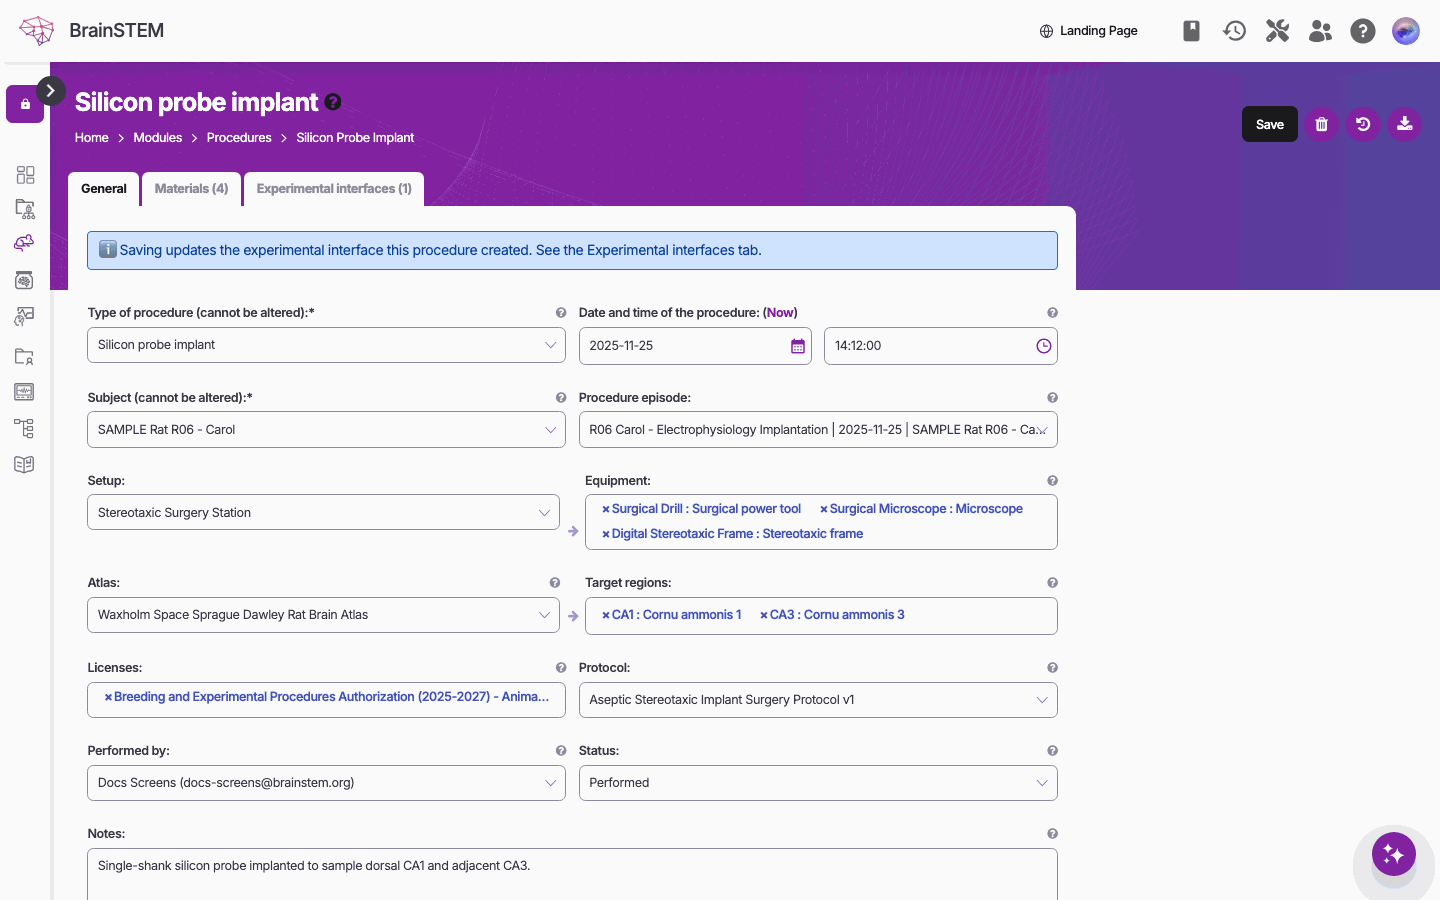
A silicon probe implant’s form: type, date, subject, episode, setup and equipment, atlas and target regions, licenses, protocol, performed by and status.
- Under Details set Dura handling Punctured, Ground placement and Reference placement Over the cerebellum, and Fixation method Dental cement and Anchor screws.
- Set Coordinates to Stereotaxic Bregma-Based Absolute Coordinates and enter the probe tip: AP coordinate -3.5 mm, ML coordinate 2.5 mm, DV coordinate 3.6 mm, and 0° for AP angle, ML angle and Rotation. Click View coordinates to check the track in the rat atlas (see Atlases and coordinates).
Choose an absolute Bregma-based system if you plan to export to NWB. The converter writes it as a localization point; surface systems with a depth are not written (see Exporting to NWB).
- On the Materials tab click + Add material and add these rows (see Materials):
| Material role | Material source | Value |
|---|---|---|
| Silicon probe (required) | Consumable stock | Inventory Neural Electrode Inventory, Consumable stock Neuropixels 2.0 probe |
| Adhesive, cement, or sealant | Manual entry | Dental cement |
| Anchor screw, pin, or fastener | Manual entry | Stainless steel skull screws |
The probe’s sites, channels and spacing come from its design in the probe catalog. Stock quantities are not counted down: set the stock’s Status by hand when the last probe is used.
- Click Create. As the form’s notice says, this creates a Silicon probe experimental interface, TM_R001 | Silicon probe implant, listed on the procedure’s Experimental interfaces tab and under Sessions → Experimental interfaces. The procedure appears on the Procedures tab of the subject’s page:
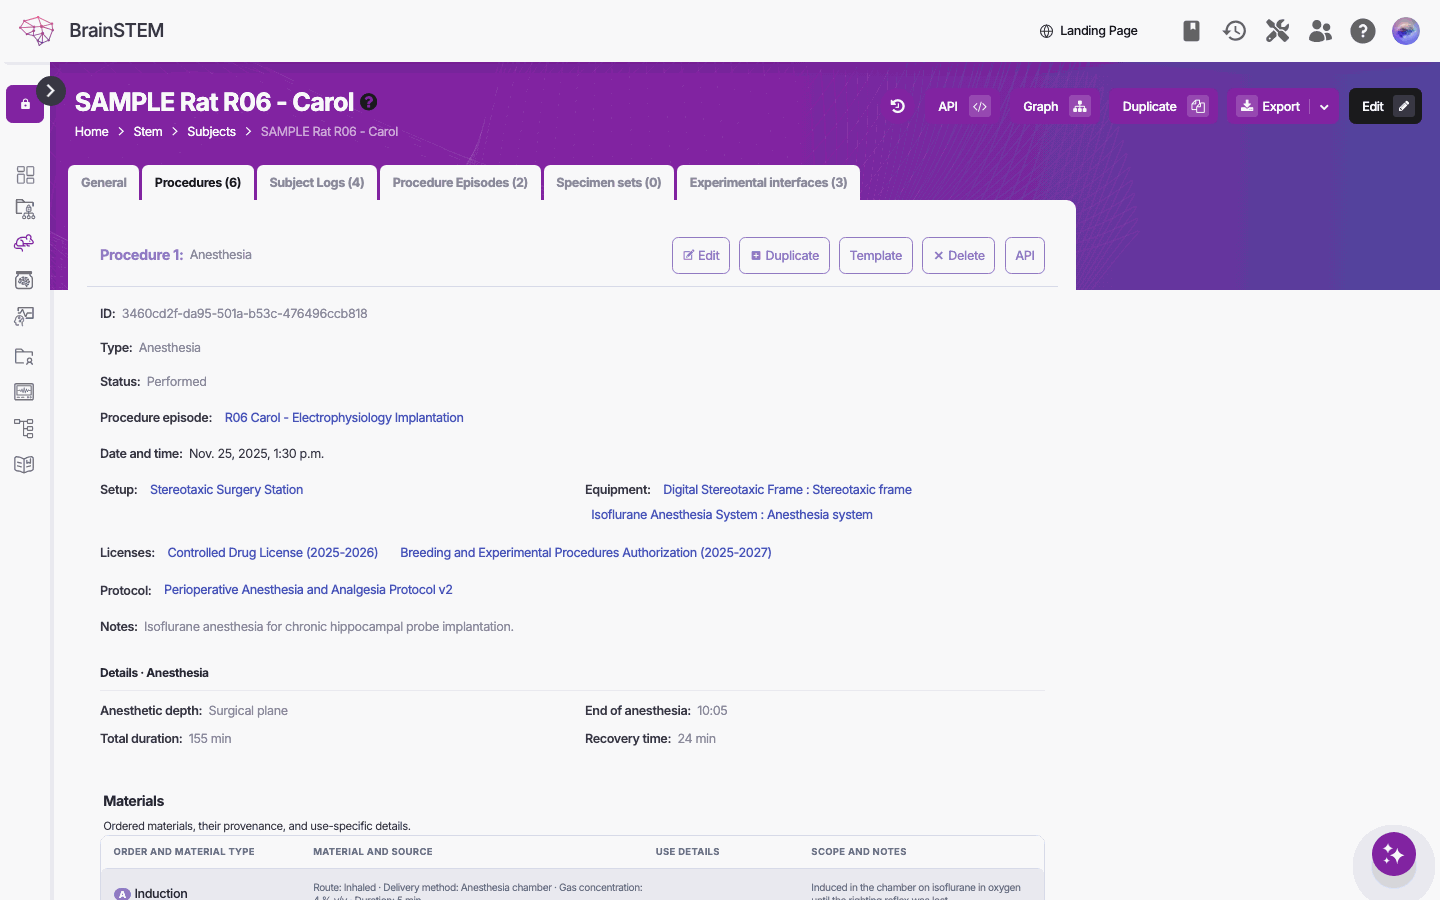
The Procedures tab of a subject’s page (here rat R06 Carol): each procedure with its details and its Edit, Duplicate, Template, Delete and API buttons
Once the implant has created its interface, the procedure’s Subject is fixed, and its Type of procedure cannot be changed while it has material rows. The interface’s type, installation date, coordinates, target regions and equipment are set by the procedure: change them on the procedure, not on the interface, where they cannot be edited.
A procedure with Status Planned creates no interface, so the recordings below cannot select the probe. Click Mark as performed after the surgery (see Planning).
Step 5b: Group the surgery into a procedure episode (optional)
- Add the companion procedures on TM_R001 as in Step 5: Anesthesia (required material Anesthetic agent, for example isoflurane) and Analgesic (material Active agent).
- Go to Subjects → Procedures → Procedure episodes, create the episode and attach the three procedures with Link existing.
The episode records the surgery as one perioperative event; see Procedure episodes.
Step 6: Create the camera and tracking interfaces
Every data acquisition names the experimental interface the signal passed through. The sleep camera and the motion tracking system each need one, created once and reused in every session of this rat.
- Go to Sessions → Experimental interfaces, click Add experimental interface and choose Create blank.
- Fill in one column per interface and click Create and continue:
| Field | Sleep camera | Motion tracking |
|---|---|---|
| Name * | TM_R001 sleep box camera | TM_R001 OptiTrack |
| Target type | Subject | Subject |
| Subject | TM_R001 | TM_R001 |
| Interface type * | Camera | Tracking system |
| Persistence * | Chronic / persistent | Chronic / persistent |
| Equipment | Sleep Box Camera | OptiTrack System |
| Details | Frame rate (Hz) 30 | Tracked markers Three reflective markers on the headstage |
The types and their details are on the Experimental interface types page.
Part C: Recording Sessions
Step 7: Pre-behavior sleep session
- Go to Sessions and click Add session.
- Fill in the first step and click Create and continue:
| Field | Value |
|---|---|
| Session name (must be unique) * | TM_R001_Day1_PreSleep_Baseline |
| Session type * | Subject |
| Projects * | Theta Maze Spatial Learning Study |
| Subjects | TM_R001 |
| Status * | Performed |
The form looks as in Get started.
- Add Date and time onset 2024-08-22 09:00:00 (the NWB converter writes no file for a session without an onset; see Exporting to NWB), Data storage Lab Server, Session name in data storage tm_r001_day1_presleep and the Tags baseline, sleep.
- On the Data acquisition tab click Add Data acquisition once per recording. Setup only narrows the Equipment list.
| Field | Neuropixels recording | Sleep video |
|---|---|---|
| Type of data acquisition * | Extracellular Electrophysiology | Video Tracking |
| Equipment | Neuropixels System | Sleep Box Camera |
| Experimental interfaces * | TM_R001 | Silicon probe implant | TM_R001 sleep box camera |
| File name | TM_R001_Day1_PreSleep_Baseline.dat | TM_R001_Day1_PreSleep_Baseline.avi |
| Format | Binary | AVI |
| Data-type | int16 | |
| Number of channels | 384 | |
| Sampling rate | 30 kHz | |
| Number of samples | 432000000 (4 hours) | |
| Frame rate | 30 Hz |
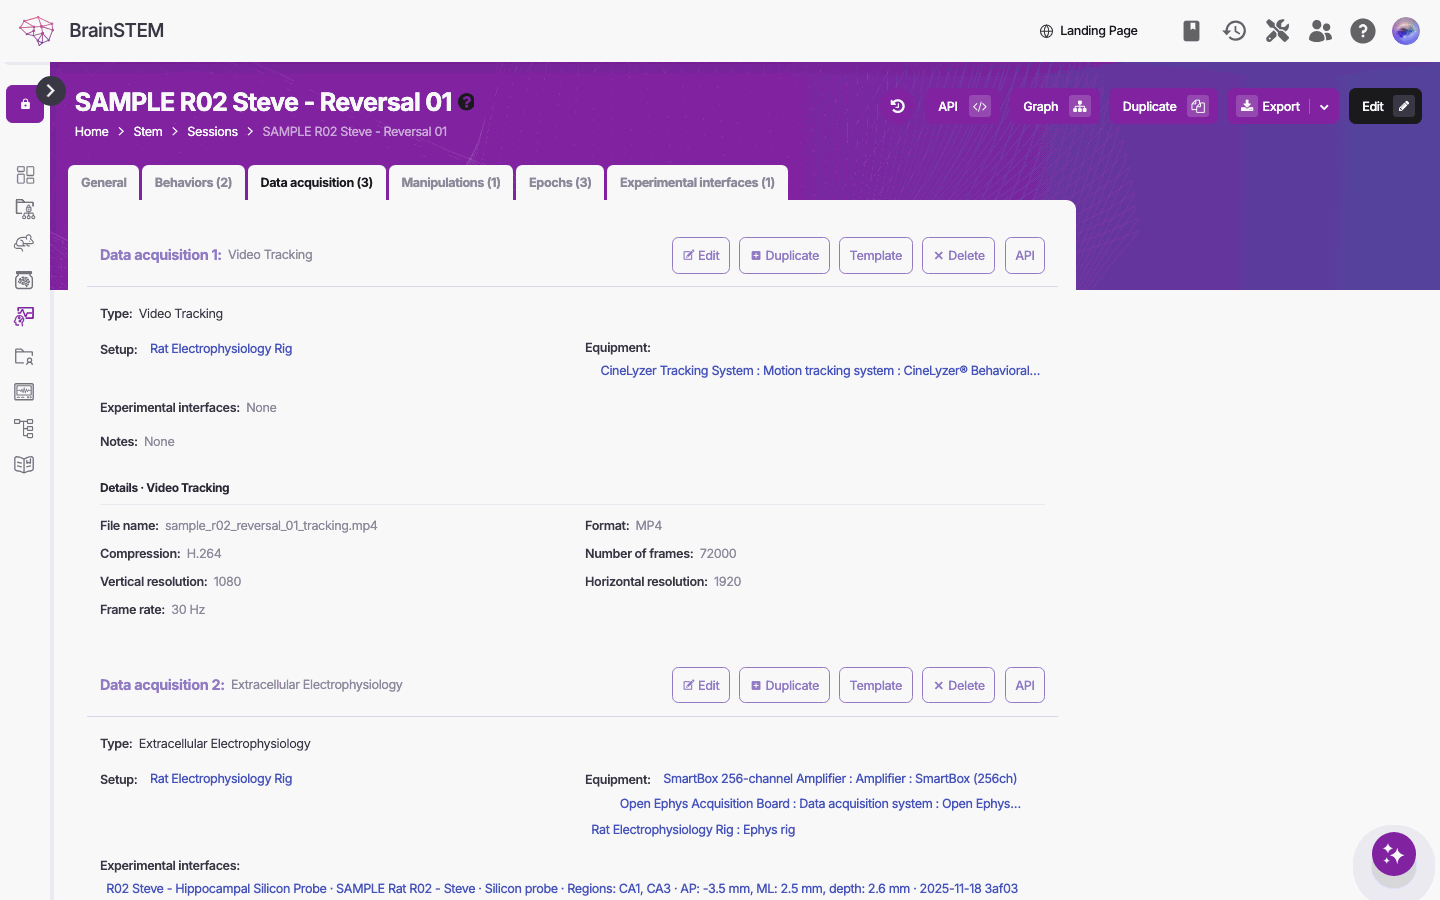
The Data acquisition tab of a saved session (here rat R02’s Reversal 01): a Video Tracking entry and, below it, the session’s second data acquisition, an Extracellular Electrophysiology entry with its setup, equipment and experimental interface
- On the Epochs tab click Add Epoch and add Habituation (Start 00:00:00, End 00:30:00) and Baseline_sleep (00:30:00 to 04:00:00), relative to the session onset.
- Drag both data acquisitions from Link to epochs onto Baseline_sleep (see Epochs). A data acquisition belongs to one epoch only, so link each recording to the epoch that covers it.
Step 8: Theta maze session
- Add a session as in Step 7 with Session name (must be unique) TM_R001_Day1_ThetaMaze_Training1, Date and time onset 2024-08-22 14:00:00, Data storage Lab Server and Session name in data storage tm_r001_day1_training1.
- On the Behaviors tab click Add Behavior and select Subjects TM_R001, Setup Theta Maze Rig and Behavioral assay Theta Maze Alternation Task. The assay is offered only for a setup of the same setup type.
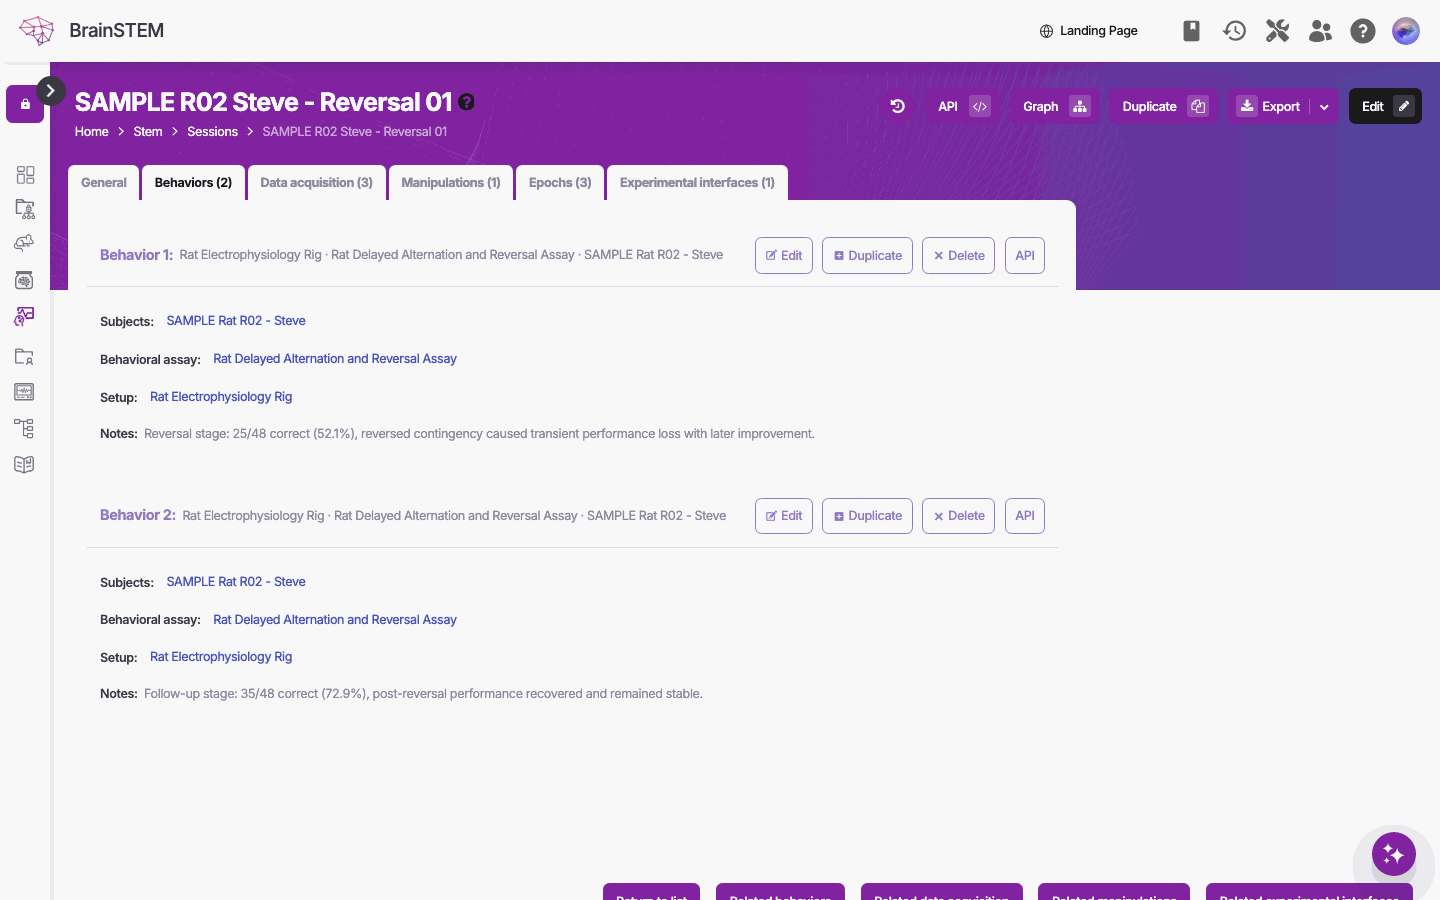
The Behaviors tab of a saved session (here rat R02’s Reversal 01): each behavior names its subjects, behavioral assay and setup
- On the Data acquisition tab add:
| Field | Neuropixels recording | Position tracking |
|---|---|---|
| Type of data acquisition * | Extracellular Electrophysiology | Behavioral Tracking |
| Equipment | Neuropixels System | OptiTrack System |
| Experimental interfaces * | TM_R001 | Silicon probe implant | TM_R001 OptiTrack |
| File name | TM_R001_Day1_ThetaMaze_Training1.dat | TM_R001_Day1_ThetaMaze_Training1.csv |
| Format | Binary | CSV |
| Data-type | int16 | |
| Number of channels | 384 | |
| Sampling rate | 30 kHz | |
| Number of samples | 216000000 (2 hours) | |
| Frame rate | 120 Hz |
- On the Epochs tab add Pre_task_rest (00:00:00 to 00:10:00), Task (00:10:00 to 01:50:00) and Post_task_rest (01:50:00 to 02:00:00). Drag the behavior and both acquisitions onto Task. The Timeline shows the result:
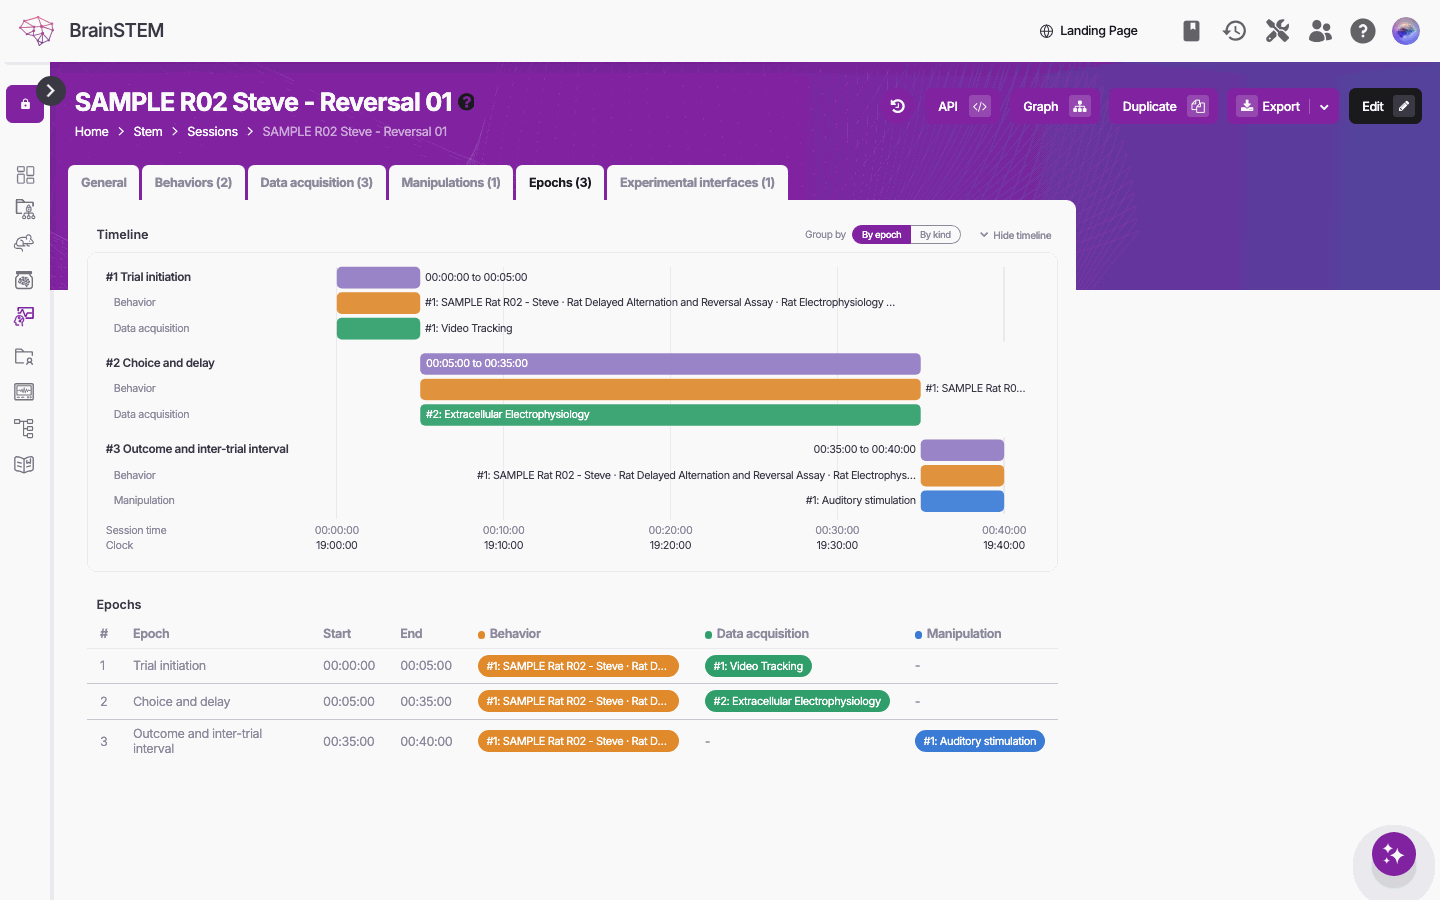
The Epochs tab of a saved session (here rat R02’s Reversal 01): the timeline of its three epochs with their behavior, data acquisitions and manipulation, and the epochs table below
Step 9: Post-behavior sleep session
- Add a session as in Step 7 with Session name (must be unique) TM_R001_Day1_PostSleep_Consolidation, Date and time onset 2024-08-22 16:00:00 and Data storage Lab Server.
- Add the two data acquisitions of Step 7 with this session’s file names and Number of samples 648000000 (6 hours).
- Add the epochs Post_task_rest (00:00:00 to 01:00:00) and Sleep (01:00:00 to 06:00:00), and drag both acquisitions onto Sleep.
Part D: Organize and Export
Step 10: Create the collection
- Go to Collections (below Sessions) and click Add collection.
- Enter Collection name TM_R001_Learning_Week1, Project Theta Maze Spatial Learning Study and the three Sessions of Steps 7 to 9.
- Click Create and continue, add the Tags learning, week1 and click Save.
Step 11: Export the project
- Open the project’s page and click Export → Download project data.
- Choose File format JSON and Contents Whole project (a single session suits one NWB file).
- Click Download.
The options and limits are on Exports and reports. Exporting to NWB converts the file; scripts can request the same export with the Python API tool.
You now have a project with a cohort of four rats; the implant of TM_R001 with its materials and the probe interface it created; camera and tracking interfaces; three sessions of day 1 with their data acquisitions, behavior and epochs, linked to the Lab Server; a collection that groups them; and a JSON export of the project.
Next steps
- Data model: Sessions, Procedures, Experimental interfaces, Data acquisition and its types, Epochs and Behaviors.
- Stimulation: record optogenetic or other stimulation as a manipulation of the session, through the interface of an implanted optic fiber.
- NWB: convert the export with Exporting to NWB.
- Imaging: the Two-Photon Imaging Workflow uses the same building blocks.
- Sharing: publish the project and the assay with Share data publicly.