Ex vivo: slices, sections and cultures
Table of contents
- Introduction
- Prerequisites
- Step 1: Create the specimen set
- Step 2: Track individual specimens (optional)
- Step 3: Record the specimen session
- Step 4: Keep specimen logs
- Step 5: Record specimen procedures
- What you have now
- Planning ex vivo work
- Where specimen records appear
- Next steps
Introduction
Subjects describe live animals. Ex vivo material has its own records: a specimen set is a batch of tissue or cultures prepared together (a slice series, a section series, a well plate), specimens are the individual items in the set, specimen procedures are the processing steps (fixation, sectioning, staining), and specimen logs follow conditions over time (bath solution, temperature, slice health). A specimen session records what you measured on the material.
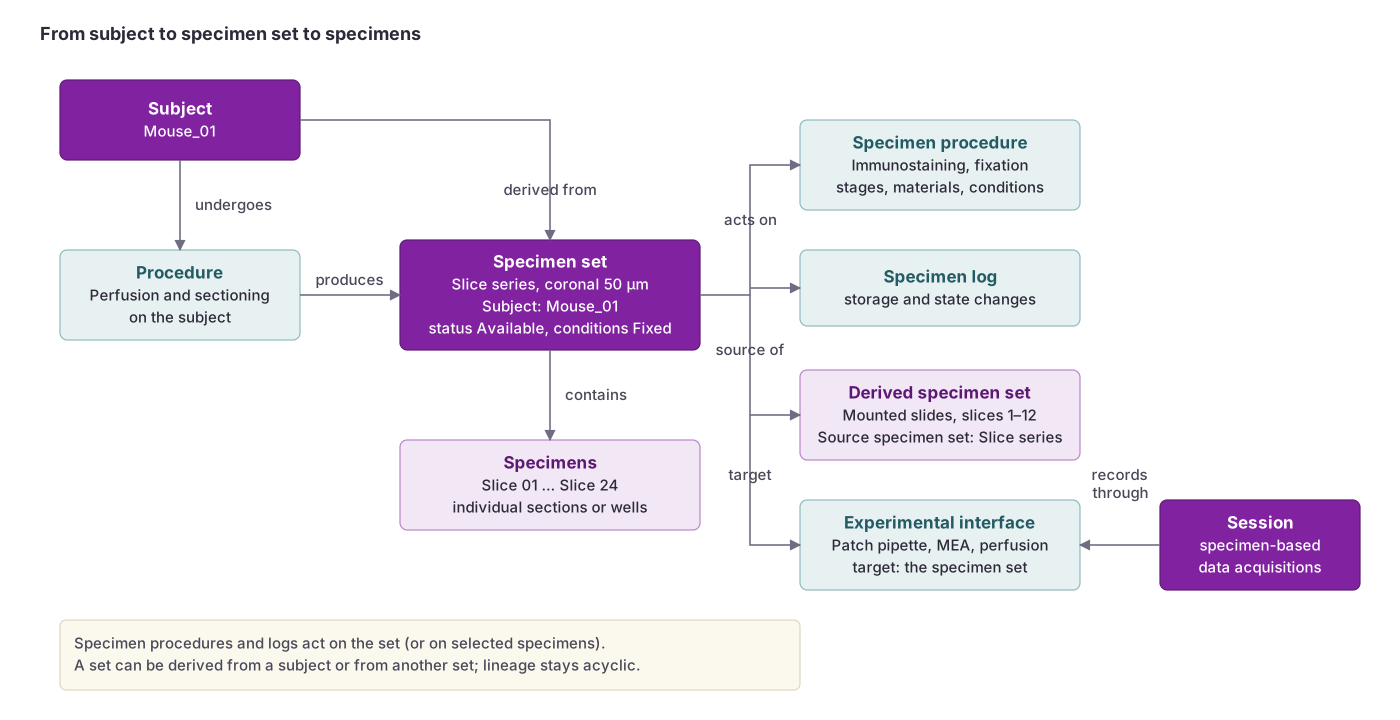 A specimen set is the ex-vivo counterpart of a subject: it holds the individual specimens, is processed by specimen procedures and logs, can give rise to derived sets, and is recorded through interfaces whose target is the set.
This tutorial walks through an acute slice experiment: a slice series cut from a mouse, patch-clamp recordings in a session, and a fixation and immunolabeling of the slices afterwards.
The specimen procedure schemas are marked experimental and may change between releases.
Prerequisites
- A project in which you are at least Contributor, directly or through one of your groups. Specimen sets inherit permissions from their projects, like subjects do. See Get started! and Permissions.
- The subject M42, the mouse the slices are cut from, in that project (see Create Your First Subject).
- Optional: your slice rig with its amplifier as equipment, and a 4% PFA fixative as consumable stock in an inventory (see Setting Up Lab Infrastructure).
Step 1: Create the specimen set
- Go to Specimen sets in the left menu.
- Click Add specimen set.
- Fill in the add form:
| Field | Value |
|---|---|
| Name * | SmithLab_M42_20260615_Coronal |
| Projects * | Select your project |
| Type * | Slice series |
| Subject | Select: M42 (the mouse the slices came from) |
| Source specimen set | Leave empty: the slices come straight from the mouse |
| Starting conditions | Leave empty: acute slices are fresh, and no condition means fresh / unprocessed |
| Status * | Available |
| Preparation datetime | 2026-06-15 09:30 |
- Click Create and continue, then fill in the full form:
| Field | Value |
|---|---|
| Item count | 8 |
| Target regions | Select the atlas, then search “CA1” |
| Storage location | Holding chamber 1 |
| Storage conditions | 32 °C, oxygenated aCSF |
Type-specific Details of a slice series:
| Field | Value |
|---|---|
| Orientation | Coronal |
| Default thickness | 300 µm |
| Holding solution | Oxygenated aCSF, 32 °C |
Names are unique across BrainSTEM. The form suggests a convention such as LabName_SubjectID_Date_Descriptor.
Subject is optional. A specimen set can stand alone (a cell culture bought from a supplier) or derive from another set through Source specimen set. A derived set starts from its source’s conditions.
The Details hold properties of the set as a whole; which fields appear depends on the type (see Specimen set types). Set Status to Planned if the tissue has not been collected yet; the header then shows a Mark as collected button for later.
Step 2: Track individual specimens (optional)
A set with an Item count needs no further records. Create specimens when you want to follow slices one by one.
- On the specimen set page, open Specimens or go to Specimen sets → Specimens.
- Click Add specimen for one item, or use Generate specimens on the set to create a numbered series at once (the form previews the identifiers before creating them). This tutorial uses slice_03 and slice_04 later.
- For each specimen, fill in the add form:
| Field | Value |
|---|---|
| Specimen set * | Select: SmithLab_M42_20260615_Coronal |
| Local identifier * | slice_03 |
| Order | 3 |
| Type * | Slice |
| Status * | Available |
The local identifier is unique within the set. After Create and continue, the full form adds Laterality (for a coronal slice through both hemispheres: Bilateral), Storage location, Quality and Notes, and a Source specimen when a piece was cut from another.
Step 3: Record the specimen session
Sessions have a Session type: Subject sessions take subjects, Specimen sessions take specimen sets.
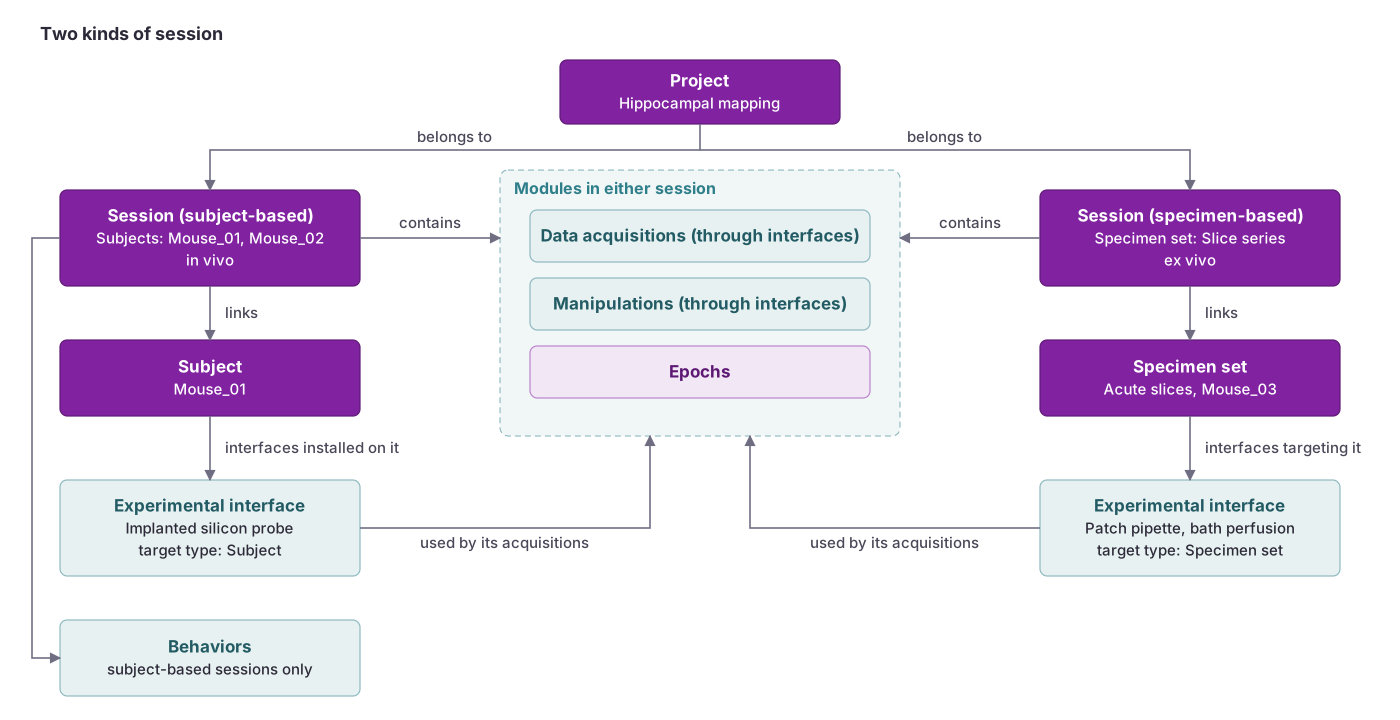 A session is either subject-based or specimen-based. Both belong to a project and hold data acquisitions, manipulations and epochs; behaviors belong to subject-based sessions only. They differ in what they link (subjects or a specimen set) and therefore in which interfaces their acquisitions and manipulations can use.
The session type cannot be changed after the session is created. Choose Specimen on the add form; a subject session cannot be turned into a specimen session later.
- Go to Sessions and click Add session.
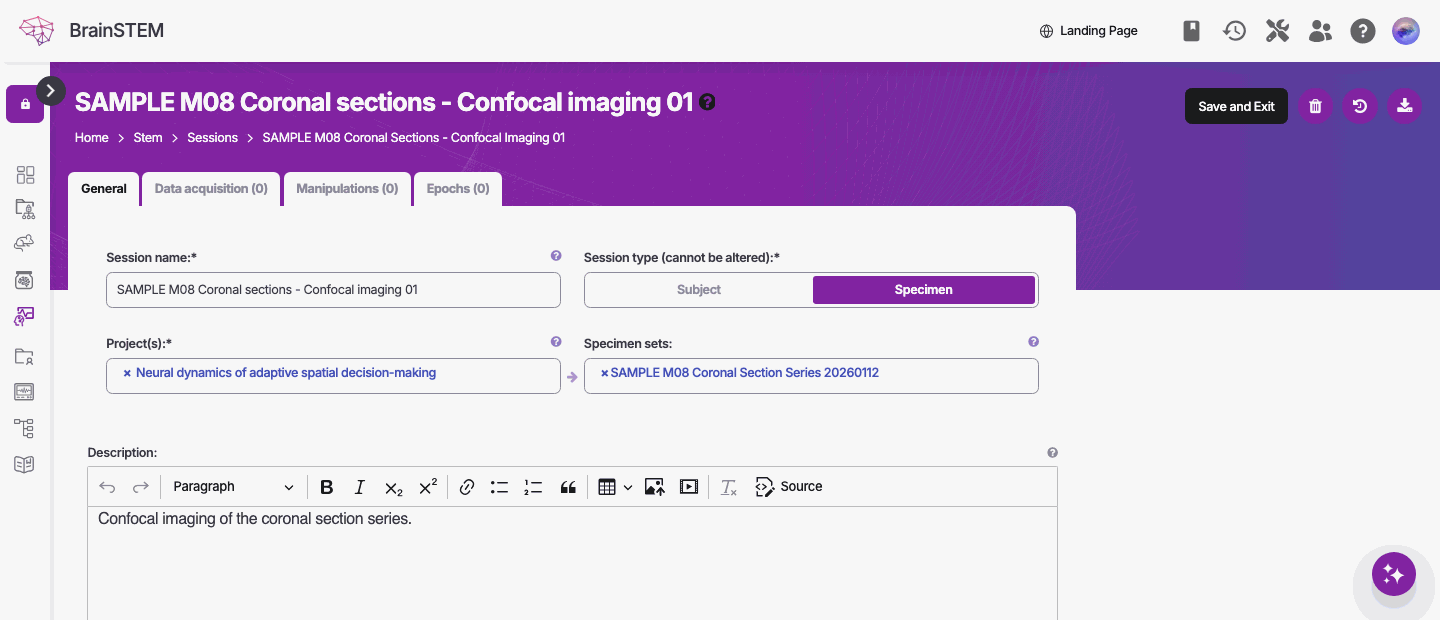
A specimen-based session’s form: session type Specimen with the specimen set it was recorded on.
- Fill in the add form:
| Field | Value |
|---|---|
| Session name (must be unique) * | M42_slices_patch_20260615 |
| Session type * | Specimen |
| Projects * | Select your project |
| Specimen sets | Select: SmithLab_M42_20260615_Coronal (required for a specimen session) |
| Status * | Performed |
- Click Create and continue, then set:
| Field | Value |
|---|---|
| Date and time onset | 2026-06-15 11:00 |
Add the experimental interface
A data acquisition must name the experimental interface the signal passed through. For a slice recording that is the patch pipette or the multi-electrode array. Interfaces for specimen sets are created by hand (implant procedures only create them for subjects).
- Go to Sessions → Experimental interfaces and click Add experimental interface, or use the + next to the Experimental interfaces field on the data acquisition form.
- Fill in:
| Field | Value |
|---|---|
| Name * | M42 slices pipette 1 |
| Interface type * | Patch pipette |
| Target type | Specimen set (an interface must target either a subject or a specimen set) |
| Specimen set | Select: SmithLab_M42_20260615_Coronal |
| Target specimens | slice_03 (leave empty when the interface applies to the whole set) |
| Persistence * | Session-level |
| Coordinates | Specimen Surface XY Coordinates with Depth |
- On the Materials tab, click + Add material and add the required Patch pipette row. Choose the Material source: Consumable stock from your inventory, Consumable from the catalog, or Manual entry with a name and specification. Add the internal solution as a Buffer row the same way.
For a multi-electrode array recording, choose the type Multi-electrode array (MEA) instead; its required material role is the array itself.
Add the data acquisition
On the session, add a data acquisition:
| Field | Value |
|---|---|
| Type of data acquisition * | Intracellular Electrophysiology |
| Experimental interfaces * | Select: M42 slices pipette 1 |
| Equipment | Select the amplifier from your setup |
Type-specific details (see Intracellular Electrophysiology):
| Field | Value |
|---|---|
| File name | M42_slice03_cell01.abf |
| Format | ABF |
| Data-type | int16 |
| Number of channels | 2 |
| Sampling rate | 20 kHz |
| Number of samples | 12000000 (10 min at 20 kHz) |
Behaviors are not available on specimen sessions. Epochs, manipulations (for example Pharmacological superfusion through a Bath perfusion interface) and data storage work as on subject sessions.
Step 4: Keep specimen logs
Specimen logs follow the material over time. They belong to the set and can be narrowed to specific specimens.
- Go to Specimen sets → Specimen logs and click Add specimen log, or use the quick-log buttons on the specimen set form (Temperature, Slice health, Bath solution).
- Choose the Specimen log type, for example Bath solution log, Temperature log, Slice health log or Generic observation.
- Select the Specimen set and, if needed, the Target specimens.
- Add entries to the log as the experiment proceeds (for example the bath temperature every 30 minutes).
Step 5: Record specimen procedures
Specimen procedures are the processing events: what was done to the tissue, with which materials, in which steps. They are recorded on the set, not on the subject.
Fixation
- Go to Specimen sets → Specimen procedures.
Click Add specimen procedure → Create blank (or Create from template when you have one).
- Fill in:
| Field | Value |
|---|---|
| Procedure type * | Fixation (immersion) |
| Specimen set * | Select: SmithLab_M42_20260615_Coronal |
| Target scope * | Whole set |
| Status * | Performed |
| Date time | 2026-06-15 16:00 |
| Protocol | Select your fixation protocol, if you keep one |
Fixation (immersion) has no type-specific fields; its duration and temperature are recorded on the Fixation stage below.
- On the Materials tab the type declares its roles. Add the required Fixative (for example 4% PFA from your consumable stock) and optionally a Buffer, a Wash solution and a Storage medium.
- Fixation has two stage types, Fixation and Wash. Click + Add stage to record each step with its conditions (for the Fixation stage: Applied/contact duration 24 h, Applied/contact temperature 4 °C, Agitation Static), and set the Stage of each material to the step it took part in. Materials that belong to no step go under Whole procedure.
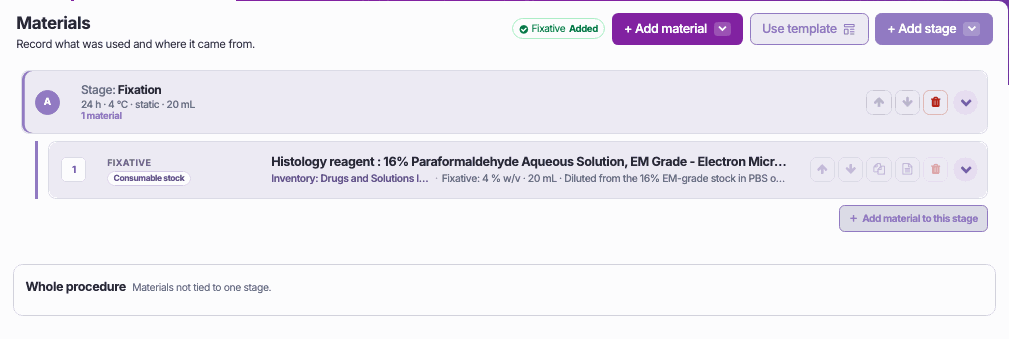
The Materials tab of a fixation by immersion: the Fixation stage (24 h, 4 °C, static, 20 mL) with its fixative, a 16% paraformaldehyde solution diluted from consumable stock, and Whole procedure for materials not tied to one stage.
Saving a performed procedure on the whole set updates the set’s Preparation conditions automatically; a derived set inherits them.
Immunolabeling of specific slices
Repeat the steps with these differences:
| Field | Value |
|---|---|
| Procedure type * | Immunolabeling |
| Target scope * | Specific specimens |
| Target specimens | slice_03, slice_04 |
Immunolabeling stages are Permeabilization, Blocking, Primary incubation, Wash, Secondary incubation, Detection and Counterstain. The required material is the Primary immunolabeling reagent; add the Secondary immunolabeling reagent, Blocking reagent and Stain or dye as used. A material row can also be limited to some of the targeted specimens with Apply only to these specimens.
Antibodies from the catalog carry their RRID, which the STAR Methods report and the NWB export reuse. If an antibody is missing from the catalog, add it as a consumable of type “Antibody or immunoreagent” with Lookup RRID; see Submit Resources & Taxonomies.
Sectioning a fixed set into a new set
Record Sectioning or Cryosectioning on the fixed set. Then create a new specimen set of type Section series with Source specimen set pointing to the slice series. The new set starts from the conditions of its source.
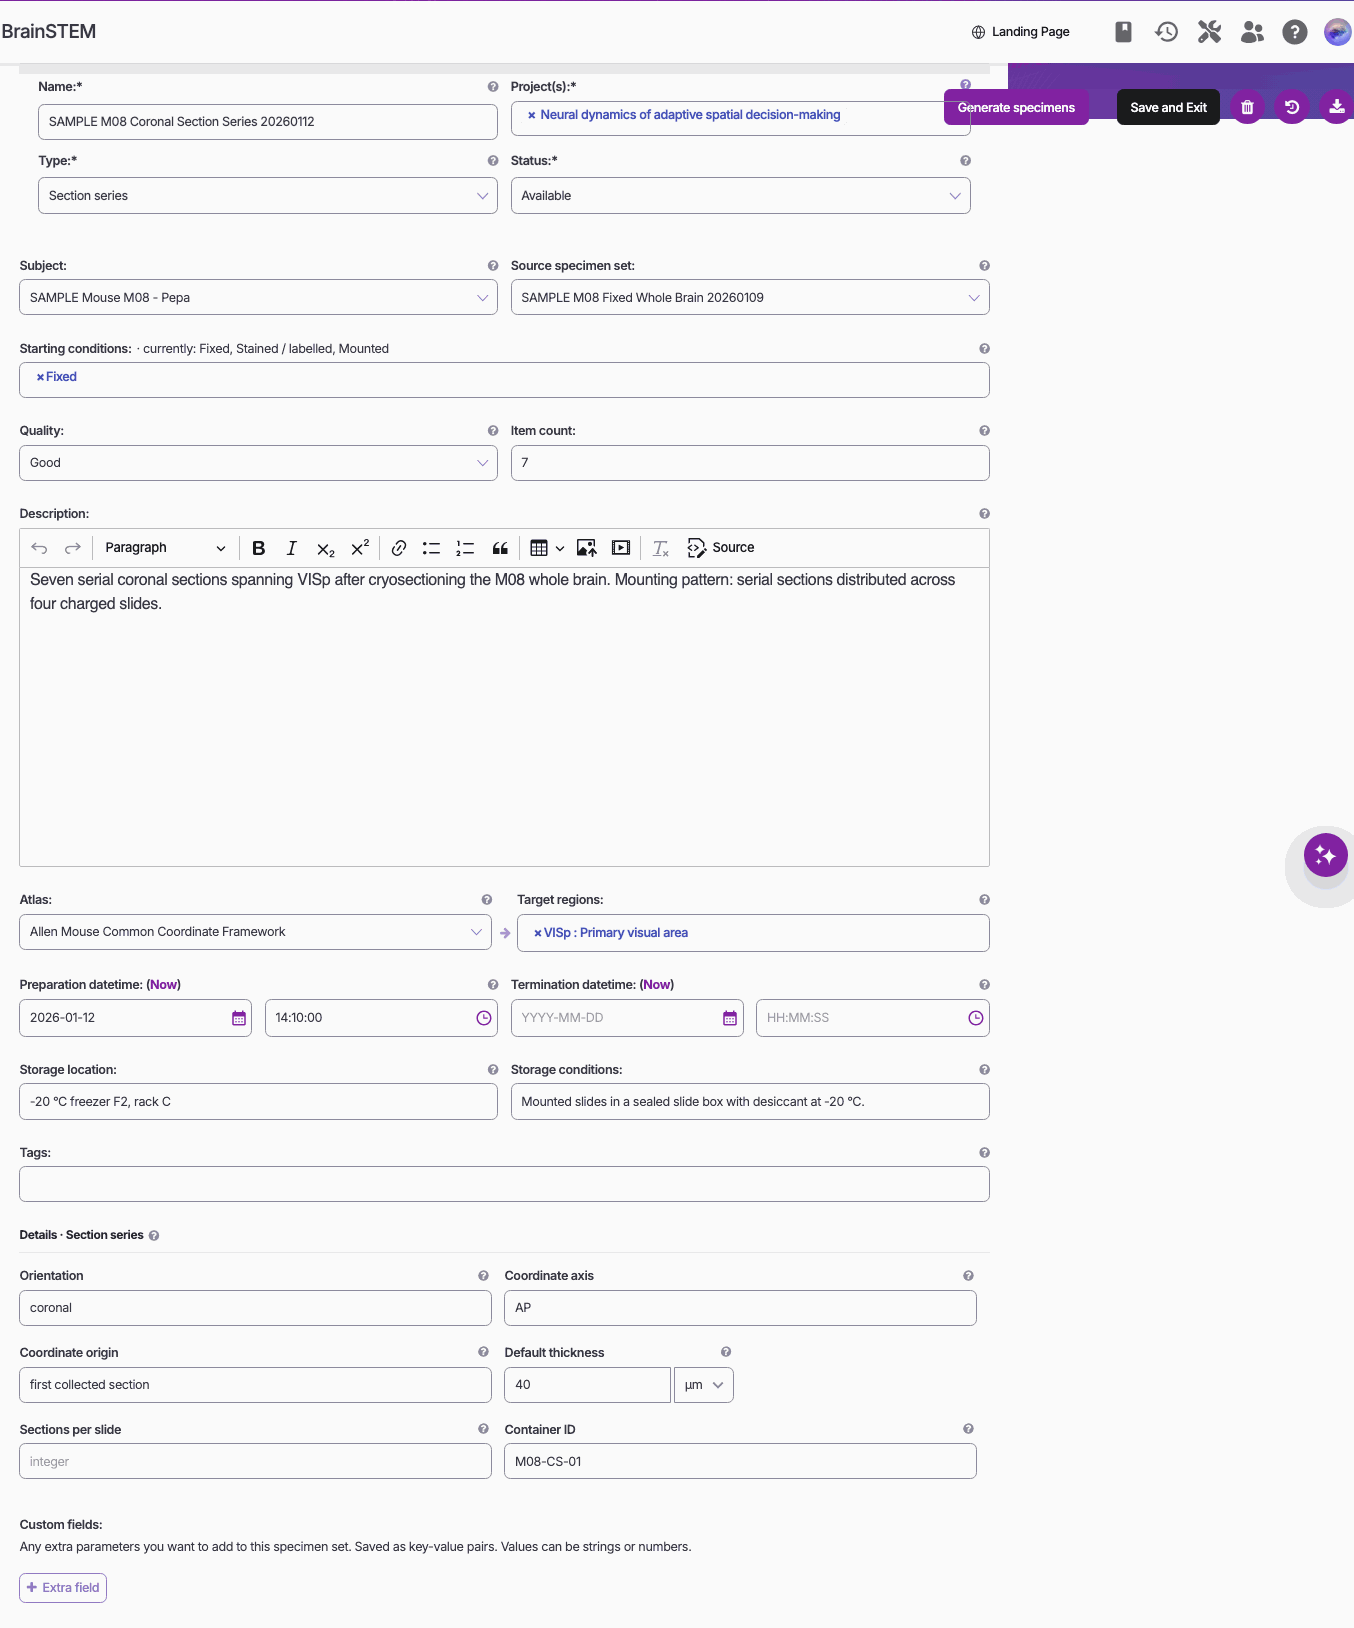
A specimen set’s full form, as it opens after Create and continue: a coronal section series with its type, status, subject, source specimen set, starting conditions, quality, item count, target regions, dates, storage and the type-specific details.
What you have now
- The specimen set SmithLab_M42_20260615_Coronal: a slice series of 8 slices from M42, with slice_03 and slice_04 tracked as specimens.
- The specimen session M42_slices_patch_20260615 with the interface M42 slices pipette 1 and an Intracellular Electrophysiology data acquisition.
- Specimen logs of the bath and the temperature during the recording.
- A whole-set Fixation (immersion), which adds Fixed to the set’s Preparation conditions, and an Immunolabeling of slice_03 and slice_04.
Planning ex vivo work
Specimen sets, specimens and specimen procedures can be Planned:
- A planned specimen set has not been collected yet. Its header shows Mark as collected; specimen procedures prepared for it stay planned until then.
- A planned specimen procedure shows an orange Planned pill. Click Mark as performed once it has happened, or select several in the list and use Mark selected planned specimen procedures as performed.
- Duplicate on a specimen set offers Copy as a plan, which copies the set with its specimens and specimen procedures as planned records.
Planned specimen sets, specimens and procedures never appear on the public portal. See Planning for the full lifecycle.
Where specimen records appear
- Templates: a specimen procedure can be saved with Create Template and reused with Create from template for the next batch.
- Exports: the project JSON export contains specimen sets, specimens, specimen procedures, specimen logs and their material usages; the XLS workbook has a Specimen procedures sheet. A session export of a specimen session includes the linked specimen sets with their whole procedure history. See Exports.
- STAR Methods: the project’s STAR Methods report lists specimen sets under Method Details, and antibodies and reagents used in specimen procedures in the Key Resources Table.
- NWB: brainstem-nwb writes specimen sets, specimens and specimen procedures to the
slicesfield of the NWB file and reaches the subject through the specimen set. - Data graph and Export work on specimen sets and specimens like on any other record.
Next steps
- Data model: Specimen sets, Specimens, Specimen procedures, Specimen logs, Sessions, Experimental interfaces and Data acquisition, and the materials overview for how consumables, stocks and material usages relate.
- Compare with in vivo: the Electrophysiology Workflow shows the subject side, where implants create interfaces automatically.
- Export: follow Exporting to NWB to turn the specimen session into an NWB file.
- Automate: the Python API tool exposes
specimenset,specimen,specimenprocedureandspecimenlogroutes.